Factory Bluetooth Retrofit
- Model & Year: 95-01 7-Series, U.S.
- Expertise: Intermediate
- Date: January 29, 2017
- Updated: October 8, 2024
- Time Estimate: 4-8 hours
Tools Required
- Basic hand tools
- NavCoder software (optional)
Facilities Needed
- None
Parts Required
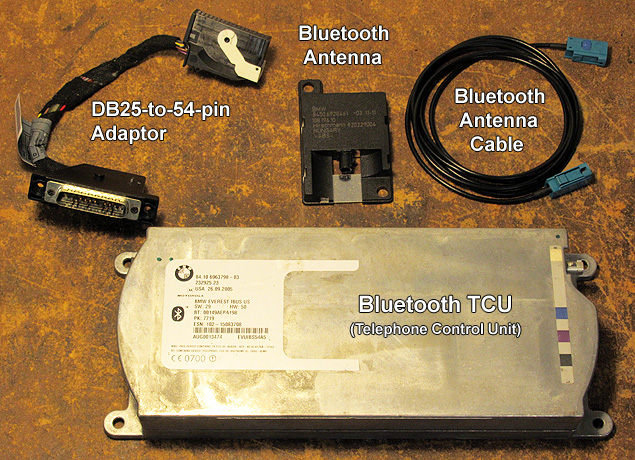
- BMW Bluetooth ULF or TCU: p/n varies, price (used): $100 - $175.
- DB25-to-54-pin Adaptor: p/n 84-12-0-308-375, NLA.
- BMW Bluetooth Antenna: p/n 84-50-6-928-461, price: $25 (used).
- FAKRA B (or Z) Cable (for BT antenna): gauge RG174, length 4ft, price: $10-$30.
Getting Started
Replacing the useless stock phone system in your BMW with a factory, hands-free "Bluetooth" system is a fantastic way to modernize your car, gain practical benefits, and fully utilize your onboard electronics.
Aftermarket BT devices (such as Grom or MediaBridge) require your radio to be continuously on and in CD mode in order to function. But a factory BT system operates independently, in the background and always at the ready. In addition, the CD changer line remains open. Now you can finally use all your car's electronics including the built-in microphone and steering wheel controls, plus view extensive phone information - including your contact list - on your nav screen or MID display!
BMW offers two different plug-in devices:
- ULF (Universal Hands-Free): Features voice control for navigation, phone, and notepad (voice memos); Requires phone pairing button, which is included with optional "eject box" phone cradles (in center armrest) that connect to roof antenna and charge your phone (also pair using Navcoder software or aftermarket buttons).
- TCU (Telephone Control Unit): Supported BMW's "Assist" roadside assistance program (now obsolete for E38); No pairing button required (pair within two minutes of starting your car); Phone cradles optional; Voice control for phone only (unless SES equipped from 9/00-on). Slightly cheaper and more numerous than ULF; Bulkier than ULF (image above).
ULF's are a good choice for cars with navigation or those seeking to restore lost functionality from defective SES modules, while TCU's offer simplicity and cost advantages. See forum discussion ULF vs TCU for more. For phone cradle installation, see "Universal Eject Box" below.
BMW made several different ULF's and TCU's over the years. The current TCU is p/n 84-10-9-195-455 (from 3/08 and still available new). The most recent ULF was 84-10-9-154-358 built thru late 2017. For a summary, see BMW TCU and ULF Part Numbers.
There are some limitations:
- Compatible ULF's and TCU's are made for voice communications, not music streaming. Only the latest TCU's offer streaming, but they're not compatible with the E38 7-series. However, there are workarounds:
- Install an aux-input in place of the CD changer, for phone-based music. (This method avoids A2DP compression losses from streaming music.)
- Install a Grom or BlueBus exclusively for wireless streaming. (RE: Grom: the factory Bluetooth system mutes radio audio during a call, and should thereby take priority. RE: BlueBus: although basic telephone functions are included, such features as contact pairing, nav voice control, and supporting nav/MID screens are not yet operational.)
- For cars with navigation: swap in a "New Generation" radio with audio streaming dongle.
- If your BMW is not equipped with DSP sound, you will need a supplemental amplifier in order to obtain suitable volume from your phone. See Factory Bluetooth Retrofit - Supplement.
The information here should be applicable to several BMW models that were pre-wired for phone from the late '90's-on.
TCU/ULF Specifics
Used TCU's are commonly available on eBay. Beware some sellers claim "Bluetooth" when in fact the TCU is an older, non-BT unit. Confirm Bluetooth by the label:
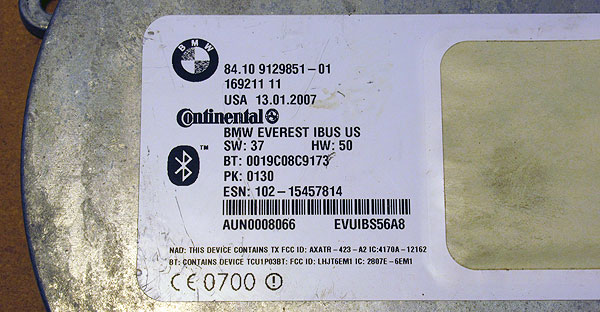
Look for the Bluetooth logo (left center) and "PK" (Pass Key) code. This code is required to pair your phone. If this label is missing or illegible, do NOT buy it! The two peel-off labels will most likely be missing (this is okay).
Verify "BMW....IBUS", as only i-bus TCU's are compatible with the E38 7-series (not MOST-bus!). The production date (above: January 13, 2007) will relate to the software and hardware version ("SW" and "HW", respectively). Look for late production dates to obtain the newest technology.
Regarding ULF's, many vendors advertise using the latest ULF part number (84-10-9-154-358) despite their unit being older. Don't be fooled: carefully scrutinize part numbers in vendor photos.
Antenna Connections
TCU/ULF cable terminals are color-coded FAKRA types. Although factory connection cables are discontinued, cables are generic parts. There are several aftermarket vendors on eBay, and custom-spec cables are sold by vCableMart.
To connect the Bluetooth antenna, use a FAKRA female-female B-type (color: white) or universal Z-type (color: aqua) with 4ft minimum length (cable size RG174). If other FAKRA types are used, they will not fit the keyed ends of the terminal:
Universal Eject Box
To charge your phone while boosting its signal thru the roof antenna, BMW offers a universal "eject box" (phone cradle) that installs in the center armrest. This is the most sophisticated way to integrate a phone into your car. See Phone Charging & Signal Boosting.
Mounting the BT Antenna
The perfect location for the BT antenna is inside the left (driver-side) C-pillar, just below the passenger courtesy light. Running the FAKRA cable inside the trunk pass-thru is surprisingly easy compared to some cars. Unfortunately, removing trim pieces for access will result in broken fasteners. The question is how many. Follow my instructions to minimize the damage.
Mounting the TCU/ULF
A factory trunk mounting bracket is unavailable for the E38 7-series. For a space-efficient installation, the E38's original TCU bracket (next to audio amp) may be modified for this purpose. Alternatvely, an adaptor board can be made from plywood and then mounted on either the outer video bracket or in place of the CD changer (if not used). Removing the CD changer bracket entirely provides the most room for a custom mounting board. See step 10 below for illustrations.
Note the TCU is a large device. If mounted as suggested, it must sit as low as possible on the bracket. If mounted on the video bracket, the TCU still contacts the taillight access door. But leaving this door ajar isn't an issue, since it's not visible after closing the larger nav access door.
Procedure
Trim Removal
1) Start by removing the nav computer (if applicable). Allow computer's red light to extinguish BEFORE proceeding. Insert radio removal tools (or coat hangars) into slots to release retainers. Then, grasp black nav trim and pull firmly:
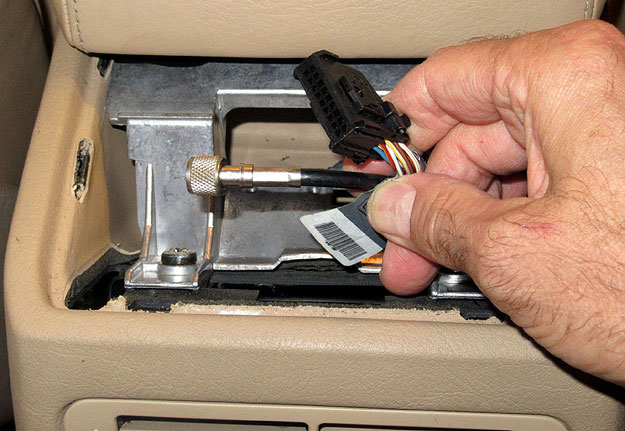
Once free, disconnect the two plugs and antenna wire. Set aside. Then, remove the black plastic trim surrounding the bracket's opening.
2) Release the two black plastic trim screws just right of both the nav and CD changer. Then, release the 1/4 turn fastener securing the taillight access door (left of nav opening). Now, remove left rear side trim by pulling out and up.
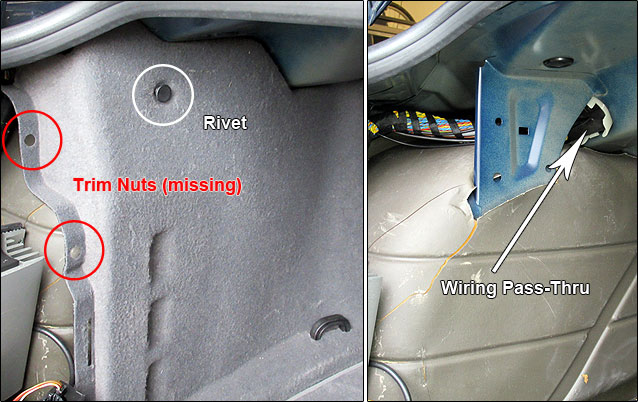
3) Pull out upper rivet on forward trim. Then, pull trim down to gain access to trunk wiring pass-thru (images above).
4) Moving on to C-pillar trim, lever out -- from the top -- the left passenger courtesy light and unplug. (Levering from the front will break the light's retainer clips. Ask me how I know.)
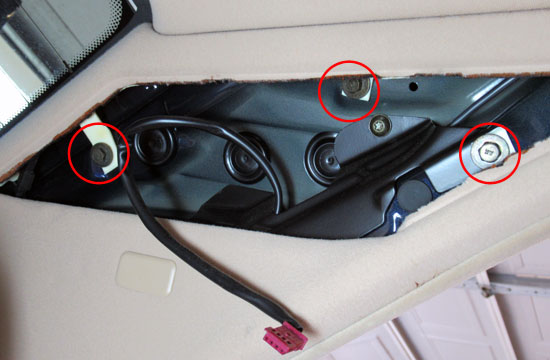
5) Release the three (3) now-visible trim retaining screws using an 8mm nut driver. See image below. Remove trim carefully by pulling out and up, in rocking motion. Afterwards, the trim will likely suffer from indentations in the (deteriorating) foam, left behind after handling. This is unavoidable. (It may be time to replace your headliner and pillar cover fabric.)
Prep Work
6) Survey your installed equipment. Remove your old TCU and associated phone parts from both the trunk and center armrest (if any). Install a blank center tray to replace any existing eject box, or install a universal eject box (see Phone Charging & Signal Boosting).
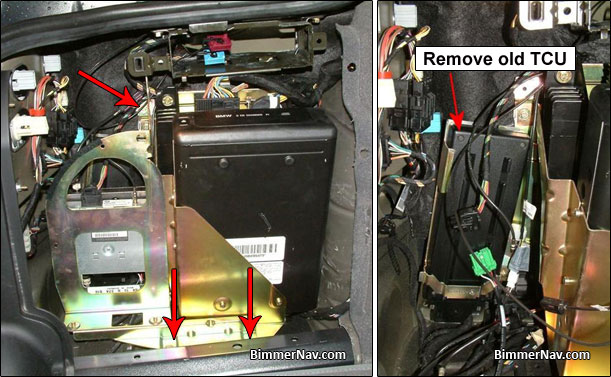
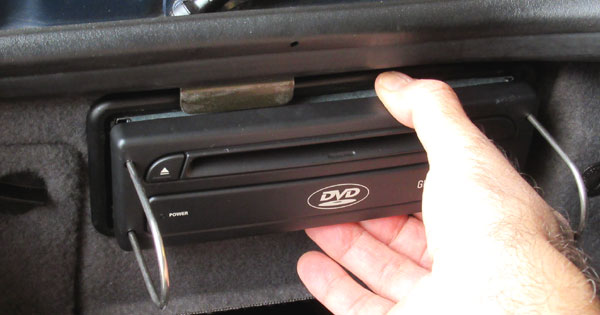
Your old TCU is likely behind the brass-color video bracket. Remove the three 8mm screws to release bracket, as shown in image above left (red arrows). Unplug old TCU and discard. (Don't bother listing it on eBay. It's worthless.) Newer cars may have TCU mounted in front, directly on video bracket:
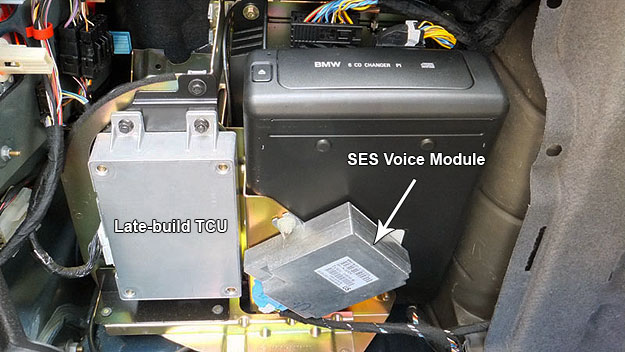
For late-build models (from 9/00), note also SES module for voice control of phone/nav/notepad. Most are no longer functional and should be discarded and capped with jumper plug (see step 8 below). Otherwise, TCU voice control can be shared with SES (after NavCoder configuration of TCU). ULF's duplicate and restore SES functionality (after SES removal).
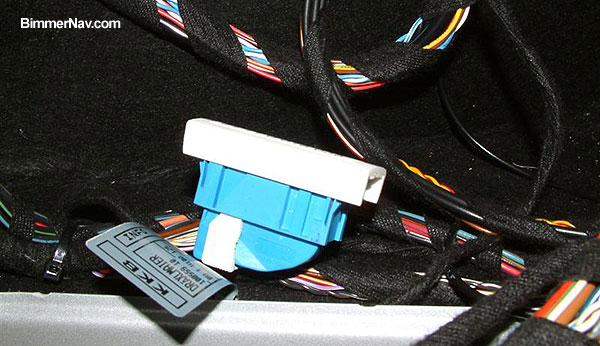
7) For cars build before 9/00 (without SES module): It will be necessary to jumper pins 11 and 14 in the black phone plug located under the center armrest. This sends phone audio to the front speakers. See image below. Pinout numbers are stamped on the connector.
8) For cars built from 9/00 (without pre-installed SES module or SES removed): Verify the blue SES connector has a white jumper plug connected (p/n 84-11-0-018-038), as seen in image below. Also, in this case, it's necessary to jumper pins 11 and 14 as shown in step 7 above.
NOTE: Installing an SES module enables voice control of nav, phone, and notepad all without jumpering pins 11/14 in the armrest plug. However, most original SES modules have now failed. Although an updated SES is available (p/n 84-41-6-915-049), a ULF will affordably and seamlessly restore this lost functionality. Cars that were pre-wired for SES should have a "talking head" icon instead of a telephone icon printed on the left steering wheel button pad.
Bluetooth TCU/ULF Installation
9) Remove video bracket for access to DB25 plug. Connect 54-pin adaptor harness to DB25, then return video bracket and secure with screws.
10) Mount TCU/ULF in desired location (Video, CD, or TCU bracket). Attach 54-pin connector.
Example 1: TCU installation on video bracket using custom-cut mounting board:

Example 2: ULF on modified TCU bracket (next to audio amp):

11) Insert coat hanger wire (or similar) in trunk pass-thru grommet, up into C-pillar area. Tape FAKRA cable to the wire and pull it back through into trunk.
12) Route FAKRA cable safely behind trunk electronics and connect to terminal of mounted TCU/ULF.
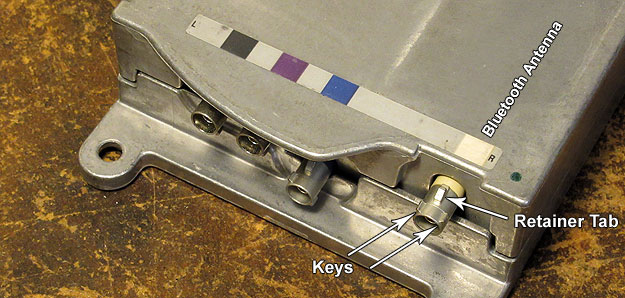
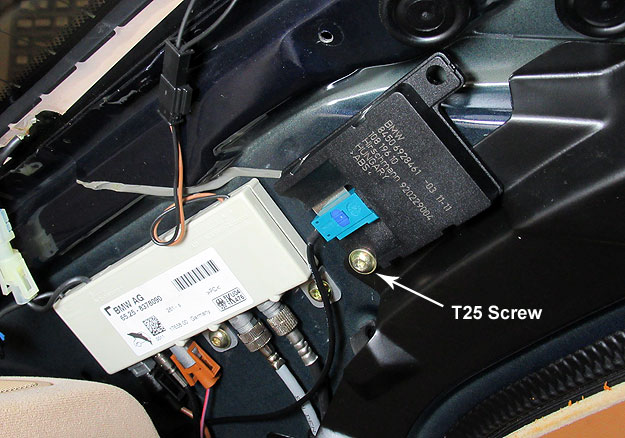
13) Connect other end of FAKRA cable to its antenna. Then, mount BT antenna just above white AM/FM amplifier by utilizing the T25 screw holding black plastic protective trim inside C-pillar. See image below:
14) Done! Before replacing trim, test your installation:
Temporarily re-connect nav computer (if applicable). Switch ignition key to accessory and attempt to pair your phone (4-digit pairing code printed on TCU/ULF label). Take optional final steps using NavCoder by confirming voice recognition ("VR") is enabled (most come this way, switch to SES if installed). NavCoder can also be used to activate phone pairing and to set Speed Dependent Volume (SDV).
15) Once satisfied, replace trim in reverse order. Finally note:
- BMW Bluetooth User Manual - for ULF installations, but also TCU applicable.
- BMW Voice Control User Manual - make use of the separate voice-activated phonebook!
- Bluetooth Telephone Menus - my supplement for cars with navigation.
- Microphone, p/n 84-31-6- 938-762 - new, noise canceling voice mic (optional, recommended for ULF!).
Now place a Bluetooth call to celebrate!