Using NavCoder
- Model & Year: 95-01 7-Series, U.S.
- Expertise: Intermediate
- Date: January 2016
- Updated: May 14, 2020
- Time Estimate: varies
Tools Required
- Old laptop computer (ex: Dell D610, IBM ThinkPad, etc)
Facilities Needed
- None
Parts Required
- "Relser" USB Interface, $35 (see Procedure below)
Getting Started
Freely available for many years and popular with BMW enthusiasts, NavCoder software allows the user to program (configure) navigation computers, telephone control units (TCUs), daytime running lights, and other devices and settings. Running on Windows only (not Apple OS), NavCoder can "see" any device that communicates on your car's i-bus (such as your radio).
NavCoder version 3 was introduced in December 2017 and includes a refined user interface. NavCoder also reports fault codes for all i-bus devices and, in version 3, provides for the clearing of those codes. Unfortunately, i-bus fault codes are reported in raw hexadecimal format and thus are undecipherable to most users. Without a cross reference to convert hex codes to an understandable format, they're sadly of no value.
Download NavCoder onto an old laptop computer (navcoder.com). You'll also need to purchase the "Resler" USB interface (resler.de), about $35, to connect your computer to your car.
Procedure
Resler Interface Prep
Installing the software is straightforward. Using the Resler interface is not.
To begin, the Resler interface offers no specific interface-to-car connection, only loose wires. It's made to connect to any source which has both power and access to the car's i-bus data line. Such a connection exists at the CD changer power plug (trunk, left side).
CD Changer Access
If you have a CD changer in place, you'll need to unscrew the changer from its mounts in order to gain access to the plug underneath. And in order to access the CD changer, remove the nav computer, to allow the left-side trim to come out.
To connect at the CD changer power plug, you'll need the following parts for a "clean" set-up:
- Universal pin terminal, female, p/n 61-13-6-931-929, $1.53 list
- (3) Pin wires, p/n 61-13-0-005-198, .68¢ (each) list
Then, insert the pin wires into the terminal as shown in panel A below:
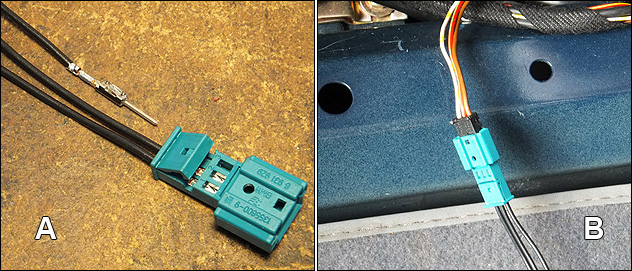
Solder or crimp the loose ends to the wires of the Resler interface using this schema:
| Car (CD Changer Plug) | Resler Interface |
|---|---|
| yellow/white (i-bus) | white |
| red/green (power) | red |
| brown/black (ground) | brown |
| (green - unused) |
Now connect to the CD changer power plug as shown in image panel B above.
Resler Interface Drivers
According to the Resler website, the current version of the interface does not require supplemetal drivers. Previous versions did. The following text is included only for those who may have older interfaces:
January 2016: When I plugged in the Resler interface to my old Dell laptop, I was prompted by WinXP to install drivers for it, but the system couldn't find any. So I went to Silicon Labs' website to download the drivers (as specified on Resler's previous website). After un-zipping the downloaded file, I put it in C:DELL\drivers and clicked on "CP210xVCPInstaller_x86", which installed the drivers.
After that, plugging in the Resler device no longer produced a Windows prompt recognizing the device, nor did it appear in the directory tree of Windows Explorer. This worried me at first. However, when connected to the i-bus (with car ignition in position 1), NavCoder recognized the device and read data successfully.
Using NavCoder
Once your Resler interface is ready, simply plug-in and set your ignition key to position 1 (accessory). With NavCoder running, you should begin to see data. No user manual exists for NavCoder. It was designed to be self-explanatory.
Coding Navigation
From the upper menu bar, select Code > Navigation to see the configuration dialog:
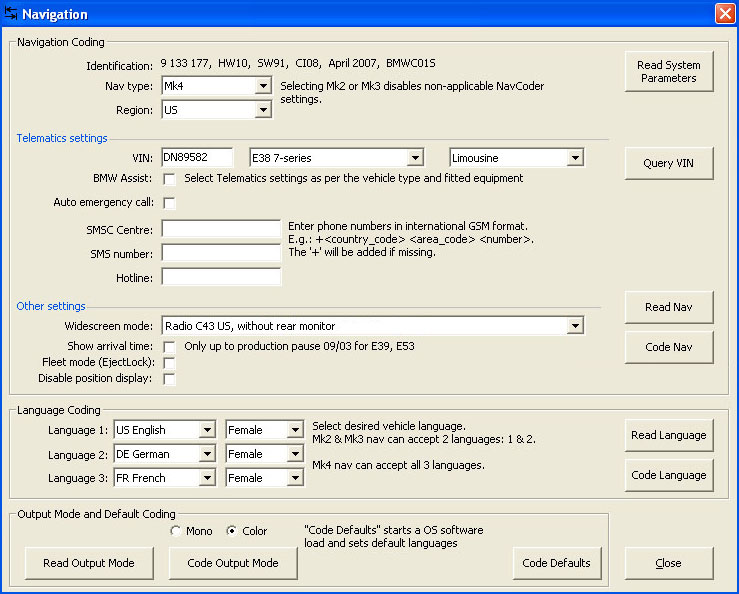
Click the Read Nav button (middle right) to get the configuration of the nav computer currently connected (hopefully, your new Mk4!).
To begin, set your nav type and verify Region is set to "US".
The annoying "lawyer" screen that displays at nav start-up will not be shown if a Region other than "US" is selected. But doing so also changes other settings such a distance readouts (switches from miles to yards) along with other subtle differences. To avoid the lawyer screen while retaining a "US" Region setting with a Mk4 nav, install nav software version 27 or above to gain auto-disappearing lawyer screens. See Mk4 Navigation Upgrade Notes.
BMW Assist is a roadside assistance program similar to GM's OnStar service. It is no longer supported in the E38 7-series. Therefore, all options under "Telematics settings" are obsolete. Un-check "BMW Assist" and "Auto emergency call". Nor is it necessary to enter your car's VIN, although doing so will make it appear on the Emergency screen.
The "SMSC" and "SMS" phone numbers probably corresponded to the SOS and Concierge buttons in the headliner of cars with Assist. Since Assist is gone, these fields can be left blank. A "Customer Service" listing appears when bringing up the phone book in a factory phone system (such as a Bluetooth TCU). However it won't work without Assist, so "Hotline" (or "Customer Service") may also be left blank.
In the Other settings section (center), verify the oddly-named Widescreen mode is set to "Radio C43 US, without rear monitor". (If you installed a New Gen radio, select it here.) And verify "Show arrival time" is NOT checked (for E38 7-series). New for NavCoder version 3 is "Fleet mode" and "Disable position display". If selected, Fleet mode prevents the nav disc (CD or DVD) from being ejected, which prevents it being lost or stolen. And while I haven't tested it, I believe Position display enables/disables the little car icon displayed on nav maps.
Once finished, click the Code Nav button to set the configuration. How cool is that?
Coding Telephone (TCU)
From the upper menu bar, select Code > Telephone to see the configuration dialog:
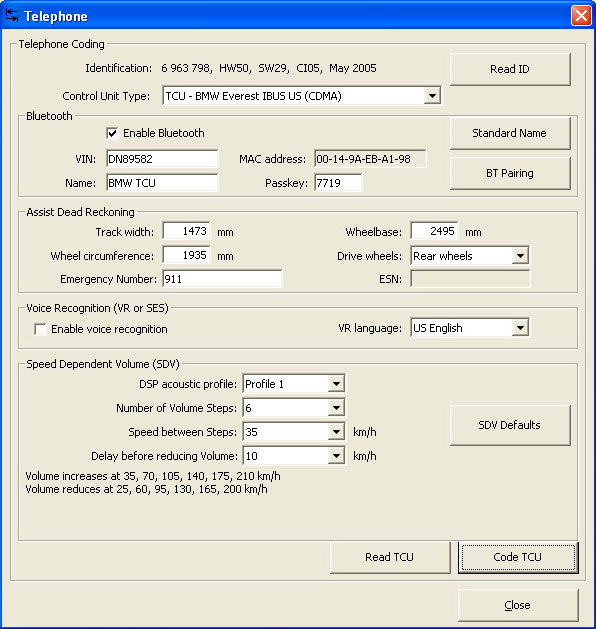
Click Read ID to retrieve your TCU's type, then click Read TCU button (at bottom).
From the top, verify "Enable Bluetooth" is checked. Enter your VIN to make it available on the "Emergency" nav screen. Enter a "Name" to appear on your phone when pairing via Bluetooth. Leave "Passkey" to match what's printed on the TCU label.
In the Assist Dead Reckoning dialog, set "Emergency Number" to 911, or perhaps AAA or a family member. (This phone number cannot be verified from any nav screen. I assume it activates in the event of a crash...?)
In Voice Recognition, "Enable voice recognition" should be on (checked) by default. This is the correct setting for cars without an SES voice module. If your car has SES (from 9/00), be sure to deselect this option (turn off).
Under Speed Dependent Volume, tighten the "Speed between Steps" to about 35kph to offset road noise. For those with DSP sound, this setting is tied to the DSP sound profile selected. Therefore, you can set different SDV's for each DSP profile available. Note this setting overrides the "GAL" feature available on radios installed in cars with DSP amplifiers (see Coding Radio below).
When finished, click Code TCU button. NavCoder will prompt you to turn off ignition and wait 15 seconds before re-start. Total coolness.
Coding Radio
From the upper menu bar, select Code > Radio to see the configuration dialog:
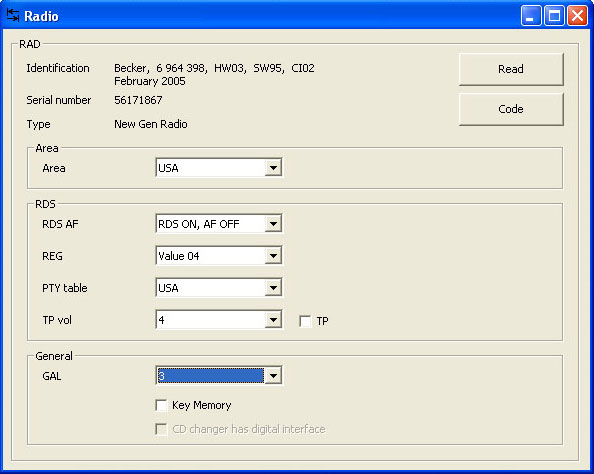
Radio coding is typically not required and is simply a "nice-to-know" feature. However it can be of use when installing new but used radios, such as when upgrading from standard C43 navigation radios to New Gen radios (or CD43/CD53 in-dash radios).
Click "Read" in upper right to fetch radio data. Then select appropriate Area which, presumably, configures it for radio broadcast systems specific to various world regions.
RDS (Radio Data System) comprises various settings and is the feature that, when enabled, displays textual radio station identification in place of frequency numbers, and scrolls song title and artist names. It is normally ON. "AF" (Alternative Frequencies) allows the radio to switch to another frequency that carries the same programming when the car travels out of range of the originally selected station (if available).
"REG" may be ignored. From Wikipedia:
This is mainly used in countries where national broadcasters run "region-specific" programming such as regional opt-outs on some of their transmitters. This functionality allows the user to "lock-down" the set to their current region or let the radio tune into other region-specific programming as they move into the other region.
"PTY" (Program Type) displays radio station genre information, providing a quick way to determine a given station's programming. "TP" (Traffic Program) enables/disables traffic broadcast interruptions and their volume, which occur in foreign countries that make this service available or otherwise mandate it. On some BMWs, this setting can also affect nav volume.
"GAL" is a German acronym for speed dependent volume. The higher the setting, the more sensitive the radio is to road speed, causing the volume to change more frequently. See also Coding Telephone above to set TCU-specific volume settings. "Key Memory" allows the radio settings (such as tone and stored stations) to be programmed to a particular key fob, and therefore makes radio configuration specific to the key in use.
BMW radios accept CD changer inputs via digital coax cable (connected to DSP amp) or standard analog cable (connected to back of radio). In example above, "CD changer has digital interface" is greyed-out indicating the digital cable is not connected and an analog input is in use. If however both inputs were connected, NavCoder apparently allows you to choose. Otherwise, the radio should auto-detect the input in use.