Nav Radio Upgrade (with Streaming)
- Model & Year: 98-01 7-Series, U.S.
- Expertise: Intermediate
- Date: May 20, 2019
- Updated: September 13, 2020
- Time Estimate: varies
Tools Required
- Basic hand tools
- NavCoder or other coding software
Facilities Needed
- None
Parts Required
- Navigation Radio:
- Becker BM53 (see below, $120 - $400 used) or
- Siemens CID (see below, $120 - $175 used)
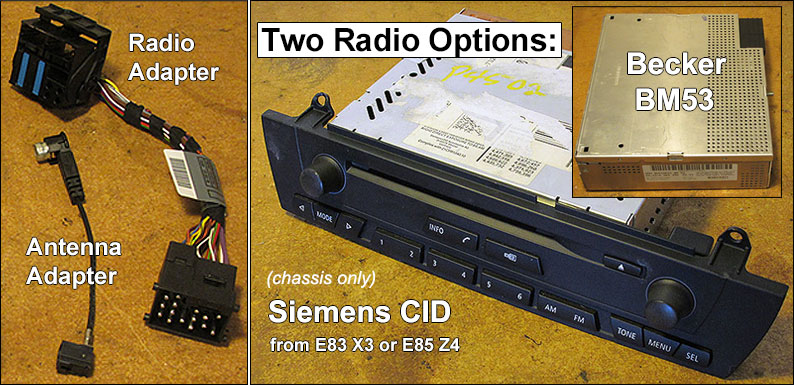
- Radio Adapter: 61-12-6-913-957 ($75 new retail),
- Antenna Adapter: 61-12-6-913-955 ($35 new retail),
- Optional Input Adapters:
- CD/MP3 Changer: 61-12-0-140-718 ($40 new retail)
- Nav/Cassette Audio: 61-12-6-924-785 ($50 new retail)
- Bluetooth Audio Streaming Dongles ($12 - $40, see below)
- Aux Input, various ($8 - $40, see below)
- Sirius Satellite Radio Module & Wiring (see below)
ADVISORY: The BM53 suffers from quality problems affecting its onboard amplifiers, resulting in loss of sound output. This well-known issue is addressed by online repair services (search keywords "BM53 radio repair"). Source a refurbished BM53 or, get yours serviced preemptively. Alternatively, source the better and cheaper Seimens CID radio. See below for more.
Getting Started
Upgrading your standard trunk-mounted navigation radio from the Alpine C43 model to a "new generation" model such as the Becker BM53 or Siemens CID will open a new world of possibilities.
For starters, these radios have a dedicated aux-in channel. This allows audio input from any source thru standardized input adapters by simply toggling your nav's MODE button to the new "Aux" channel. Now, music playback from an iPod or other device is possible (keep your device handy, since you'll control your music from the device).
Additionally, factory Sirius satellite radio operates thru these radios when coupled with Mk4 navs. The radios also display Audiotext (or ID3 tags) with factory MP3 CD changers (plug-n-play replacement of stock changer). Audiotext provides song title, artist, and album descriptions on Mk4 navs to assist in the playback and navigation of large - properly tagged - mp3 collections. (Audiotext works only with factory MP3 changers [not iPods, etc]. ID3 graphics [album art] is not supported.)
But perhaps most interestingly, Bluetooth audio streaming is possible using aftermarket adapters which plug into the AUX channel. These adapters are available from a variety of sources (see below for more) and require a 12 volt power supply, available from the radio wiring harness.
Audio streaming is very popular and is commonly achieved thru aftermarket devices such as Grom. Although the Grom device is perfectly workable (but somewhat buggy), it connects thru the CD channel and requires seperate adapters. By contrast, streaming thru the aux channel does not require any adapters. Moreover, the CD channel remains open for use with a changer, factory Sirius radio, aftermarket XM radio, or even a second aux input.
For those with DSP audio, a bonus: these radios no longer require expensive and complex DSP adapters to route digital audio into the DSP amplifier. Instead, analog audio can be routed directly from an aftermarket device (like Grom) into the radio, creating in effect a "standard" audio system.
This change results from configuring the nav computer to recognize a "new gen" radio instead of the C43 by using NavCoder or similar software. This is an important step, especially for DSP audio, otherwise your new radio may not function correctly. (Ask me how I know!) Don't worry, making this change with NavCoder involves only a single point-and-click operation (see Procedure).
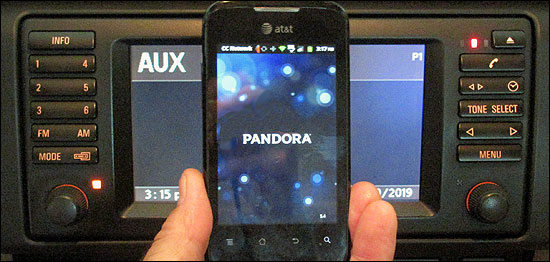
Radios
Becker BM53 Nav Radio
This was the first "New Gen" radio, updated frequently by BMW. Choose one with features you desire: (Read more)
| Production | Model | Aux | Sirius** | ID3*** |
|---|---|---|---|---|
| 09/01/01 - 03/01/02 | 65-12-6-904-213(4*) | |||
| 03/01/02 - 10/23/02 | 65-12-6-919-080(1*) | |||
| 09/01/02 - 07/28/03 | 65-12-6-922-512(3*) | √ | ||
| 12/01/02 - 07/17/03 | 65-10-6-933-089(90*) | √ | ||
| 08/01/03 - 11/23/04 | 65-12-6-927-910(1*) | √ | √ | |
| 09/01/04 - 11/23/04 | 65-12-6-943-449(50*) | √ | √ | |
| 11/15/04 - 01/27/06 | 65-12-6-964-398(9*) | √ | √ | |
| 03/01/05 - 10/18/05 | 65-12-6-972-662(5*) | √ | √ | |
| 09/01/05 - 07/26/06 | 65-12-6-976-961(2*) | √ | √ | √ |
| 03/01/06 - current | 65-12-6-988-275(6*) | √ | √ | √ |
Note early models didn't support aux-in, while only late models support ID3 Audiotext. The BM53 also provides a cassette tape input (from in-dash monitor). Used models start around $120 (from eBay, for example). Naturally, newer models with more features fetch higher prices.
Sourcing a factory remanufactured model should avoid the "bad amp" issue mentioned in advisory above. Be aware that aftermarket repair services may install amps of various quality, resulting in new issues (ex: static with radio OFF, amp noise with radio ON, etc). So, choose repair services carefully.
Siemens CID Nav Radio
A radio of better quality than the Becker (no amp faults) and generally less expensive. Some models include: (Read more)
| Production | Model | Aux | Sirius* | ID3** | IBOC*** |
|---|---|---|---|---|---|
| 09/01/03 - 03/15/04 | 65-12-6-932-548 | √ | √ | ||
| 03/01/04 - 05/08/06 | 65-12-6-939-671 | √ | √ | ||
| 09/01/05 - 05/31/06 | 65-12-6-987-177 | √ | √ | √ | |
| 03/01/06 - 11/18/09 | 65-10-9-118-825 | √ | √ | √ | |
| 03/01/07 - 01/13/09 | 65-12-9-136-893 | √ | √ | √ | √ |
| 09/01/07 - 09/09/08 | 65-12-9-166-374 | √ | √ | √ | |
| 09/01/07 - 01/08/10 | 65-12-9-150-594 | √ | √ | √ | |
| 09/01/07 - 06/07/09 | 65-12-9-150-596 | √ | √ | √ | √ |
| 11/01/08 - current | 65-12-9-205-283 | √ | √ | √ | |
| 11/01/08 - current | 65-12-9-205-285 | √ | √ | √ | √ |
The Siemens shares features with late-model Beckers and has the added benefit of HD radio on some models (not to be confused with satellite radio).
The catch? This is an in-dash radio made for E83 X3 and E85 Z4. It therefore has a conventional faceplate, which needs to be removed (along with its onboard CD player) before trunk fitment. This is a simple task accomplished with a small screwdriver in 30 minutes, as illustrated in this helpful video. Afterward, installation procedures are identical to the Becker.
Also, the Siemens has a number of new features not shared with the Becker (but no cassette tape input). See Siemens CID Radio Prep for details. To locate a seller, perform a search using keywords "BMW E83 X3 Navigation Radio".
Many resellers offer new gen radios complete with snipped electrical connectors. This allows splicing into existing wiring and avoids the need to purchase wiring adaptors (specified above). But beware: a cut-n-splice approach takes place within very limited room inside your trunk, and may result in back aches and crossed wires. Those who prefer an easy, reversible, plug-n-play installation should use wiring adapters.
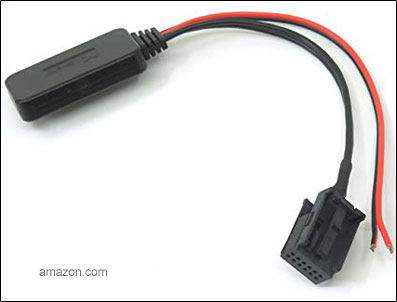
New gen radios are configured to accept two 12-pin inputs on the rear. BMW previously used 10-pin connections on their radios but switched to this new standard in 9/01, which is shared by other makes such as Audi, Mercedes, and Porsche. The left input accepts white plugs and is coded for CD (nav displays "CD") while the right accepts black plugs and is coded for auxilliary (nav displays "Aux").
After installation, use NavCoder or other coding software to switch radio settings. See Procedure section below for more.
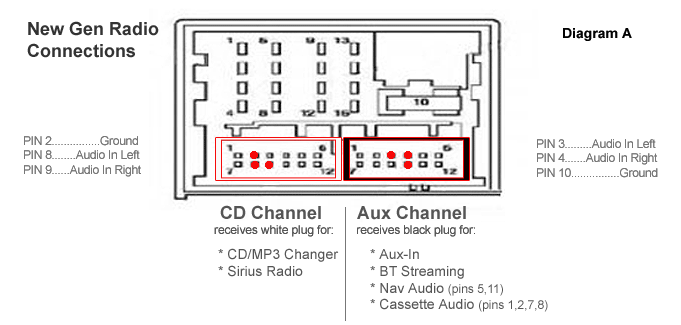
Bluetooth Audio Streaming
Finally, a factory-like way to stream Bluetooth audio from your phone! Listen to Pandora or Spotify in your E38 7-series, or stream your personal mp3 collection. When using nav apps like Waze, audio directions and alerts will be streamed too.
Mostly plug-n-play, these streaming "dongles" are sold by a variety of sources such as Amazon and eBay, starting at $12. Really. To purchase, simply perform a search using keywords "bmw 12 pin bluetooth adapter".
These devices require a power/ground connection, readily available from the nearby radio connector (details in Procedure below). The wire length provided by these adapters is short (about 10") requiring the receiver "puck" to remain in the trunk, but your phone will have no trouble connecting. Note:
- Use streamers coded with black 12-pin plugs only (for aux channel). Streamers with white 12-pin plugs are not compatible.
- BT streaming devices are not for hands-free telephone use. Streaming is for music playback only. Bluetooth telephone functions require either a factory TCU, ULF, or aftermarket BT phone device (such as Grom).
- The BlueBus is a sophisticated streaming alternative (although its telephone features don't yet compare to TCU's).
- Control over streaming music comes from your phone, so keep it handy while driving. Streaming draws considerable battery power from your phone, so consider Phone Charging & Signal Boosting.
NOTE: The device interaction that streaming provides can become an addiction, so please don't allow yourself to become a distracted driver!
Sirius Satellite Radio
Full factory integration of Sirius satellie radio is possible with a Mk4 nav, full screen monitor, BMW Sirius receiver, and a Sirius-capable new gen radio. The Sirius receiver daisy-chains off the CD changer input with its adapter wiring, allowing full use of both components. For a full description of this installation including required parts see:
- BMW Sirius Retrofit - by Ryan Schultz (written for E39 5-series but applicable)
Of course, satellite radio requires a subscription fee.
Input Adapters
Adapter cables are available to route various existing audio sources into the new radio:
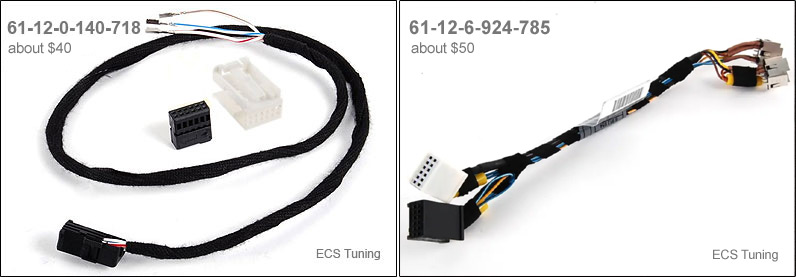
Cable '718 is for the factory MP3 changer or Sirius module, and also to retain use of a stock changer or existing aftermarket Bluetooth adapter (such as Grom). It's sold un-pinned (for use with various radios) and therefore requires manual pinning of the white connector. This task is straightforward and takes 5 minutes (see diagram A above). Remember, the existing mini-cable that routes digital audio into the DSP amplifier may be discarded. Instead, analog audio can be routed directly into the new radio eliminating the need for aftermarket DSP adapters.
TIP: If you wish to retain the digital input with your DSP system you may do so. The radio will auto-detect the interface in use (analog or digital). Although using the digital input negates the need for cable '718, it requires DSP adapters for aftermarket devices (as before).
Cable '785 adapts both nav audio (spoken nav directions) and cassette tape audio (from in-dash monitor, works only with BM53). Of interest is the black plug only, which contains the needed inputs. The white plug should be ignored in favor of cable '718 or others. The black plug leaves pins 3, 4, and 10 open, for use with aux-in or streaming adapters (see diagram A above).
MP3 Changer
The MP3 CD changer is plug-n-play (p/n 65-12-9-131-852) and requires cable '718. Note this changer is physically different from changers made for the E38 7-series and won't fit in the same spot. It will require an alternative mounting location (ex: suspended from trunk upper deck). ID3 Audiotext is displayed on Mk4 navs.
Aux-Input
1/8" mini jack connections can be found everywhere for new gen radios. They are commonly available from online sources such as eBay and Amazon, ranging in price from $8 to $10. There are variations of this input type as well, depending on the device you wish to connect. For example, an RCA-type input adapter is available:
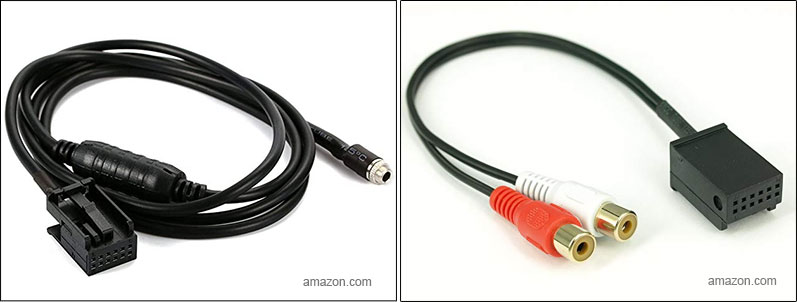
To purchase, simply perform a search using keywords "bmw 12 pin aux-in". If you prefer the factory aux-in, use part number 82-11-0-149-390 (about $40). Note:
- Use adapters coded with black 12-pin plugs only (for aux channel).
- To use the CD channel as an aux input requires specialized adapters from Grom or Blitzsafe coupled with either white 12-pin plugs or DSP inputs.
A suggested mounting location for the mini jack input is in the glovebox or inside the ashtray. Generic extension cables will be required to obtain the length needed to run the input to the front of the car. If using adapter cable '785 with your radio, remove the three needed pins from the black aux connector and insert them into cable '785 according to diagram A above.
A benefit of using an aux input versus streaming BT music is that the aux method avoids A2DP compression losses, since music is routed directly into the radio. This means your music may sound a bit better using an aux-in.
Procedure
Navigation radios reside behind the audio amplifier in the left-rear trunk. To gain access, it's necessary to unplug and remove all existing electronic gear along with their associated mounting brackets.
1) Remove nav computer, then remove side trim to expose existing electronics gear.
2) Remove the three different brass-colored brackets which hold electronics such as the CD changer, Telephone Control Unit (TCU), SES voice module, and audio amplifier.
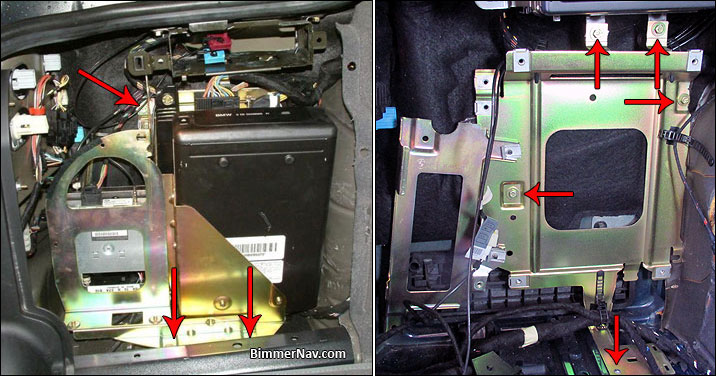
- The outermost bracket holds the telephone antenna amplifier, TCU (9/00-on), and optional video module. Its three 8mm fastners are shown in image above left (red arrows).
- The middle bracket holds the CD changer and SES voice module (9/00-on), and is secured with a single fastner at the rear.
- The innermost bracket holds the amplifier and TCU (thru 9/00). After removing the amp, the bracket's five 8mm fastners become visible, shown in image above right. Release attached wire ties also.
DSP Audio Amplifiers
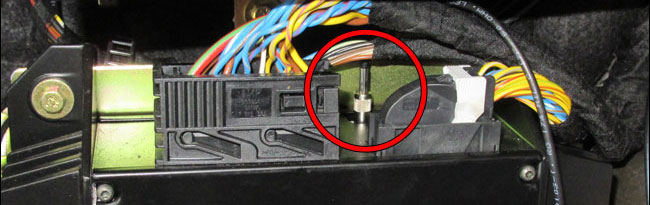
A digital mini-cable runs directly from the CD changer or aftermarket DSP adapter (such as Grom) into the amp, as shown in image below. If installing CD changer cable '718, unplug and remove this mini-cable along with any DSP adapter, since these items are no longer required with new gen radios!
3) Release the two 10mm nuts securing the nav bracket and remove nav bracket. This makes room for radio removal.
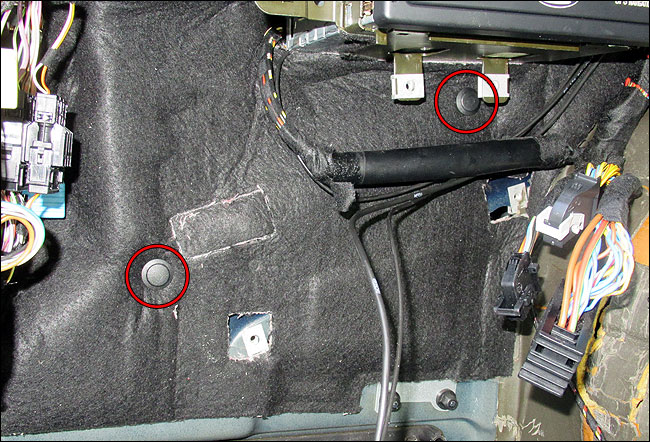
4) With all brackets removed, locate the two plastic rivets holding the black fabric that hides the radio. See image below (nav with bracket shown for orientation purposes). Pry out the rivet pin, then the plug. Then carefully pull away black fabric cover.
5) The radio, secured in its own bracket, will now be visible:
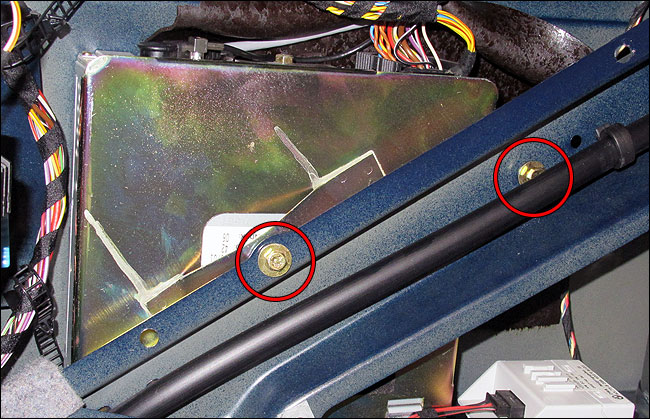
The radio bracket is secured with two 8mm fastners, one of which is hidden behind the sunroof water drain tube. Unclip tube for access. See image above.
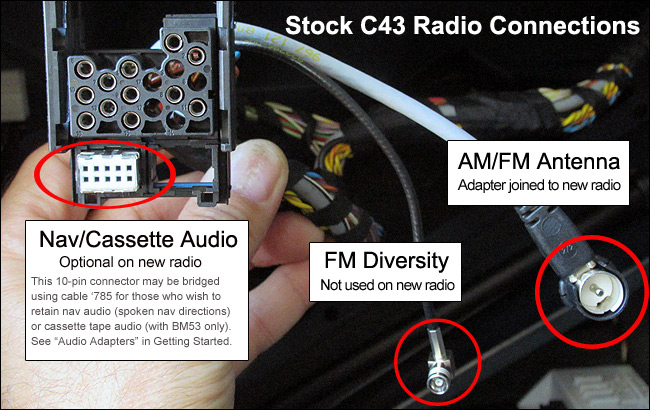
6) Extract radio with bracket from behind framing. Unplug all radio connections, then separate bracket after releasing its single 8mm fastner. For reference, connections are shown below:
Prepare Adapter Accessories
Gather all adapters and accessories to be used with the new gen radio (CD changer cable, BT streamer, aux-in adapter, etc).
7) Plug accessories into their appropriate slot in the radio wiring harness. Remember, white plugs feed the CD channel and black plugs feed the Aux channel. The plugs are keyed for correct installation. See illustration below:
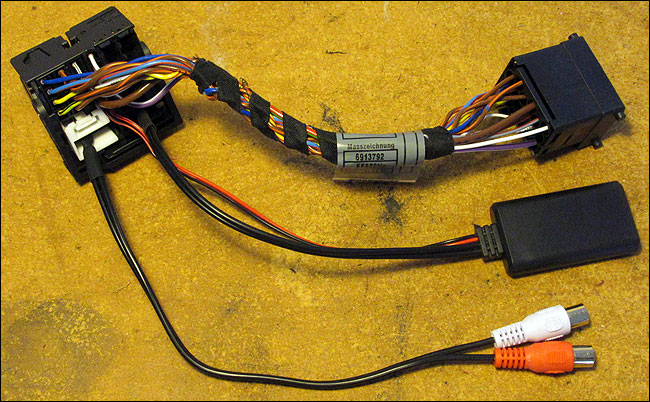
In example above, the CD channel supports an RCA-type aux-in using the Blitzsafe adapter (not shown) while the Aux channel supports a Bluetooth audio streaming dongle.
Supplement: Installation & Use of Bluetooth Audio Streamer
If using aux-inputs (either 1/8" or RCA), be sure to have additional (generic) cable length on hand to extend to the front of the car.
Radio Installation
8) Attach radio bracket to radio and secure it with 8mm nut and washer or similar fastner. See image panel A below. (By contrast, the C43 is secured with 8mm screw fastner). Then, connect radio wiring harness to radio (with attached accessories and adapters) along with antenna adapter.
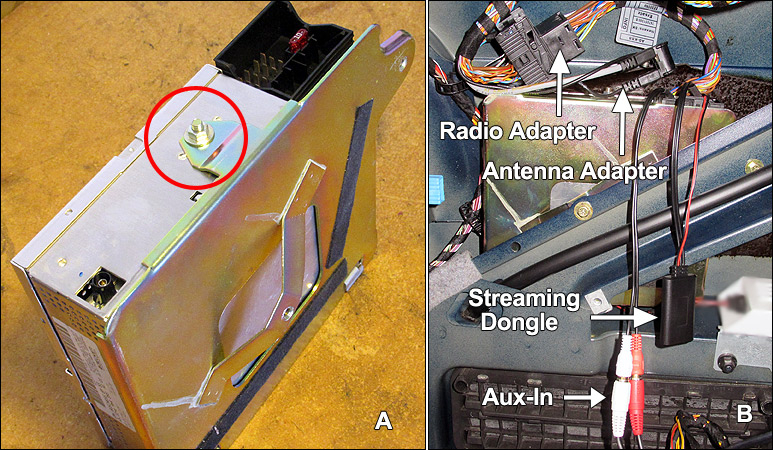
9) Insert radio back into position in car and secure radio bracket with fastners. Then, mate wiring harness and antenna adapter to car (FM diversity cable goes unused). See image panel B above.
10) Re-install black fabric cover and secure with rivets, then re-install all components and brackets in reverse order. Route wiring to appropriate locations.
Coding Radio
11) Before testing your installation, reconfigure your nav computer to work with the new gen radio. As previously described, NavCoder is ideal for this purpose. If you're new to NavCoder, see Using NavCoder for more specifics.
Select Code > Navigation to see the configuration dialog:
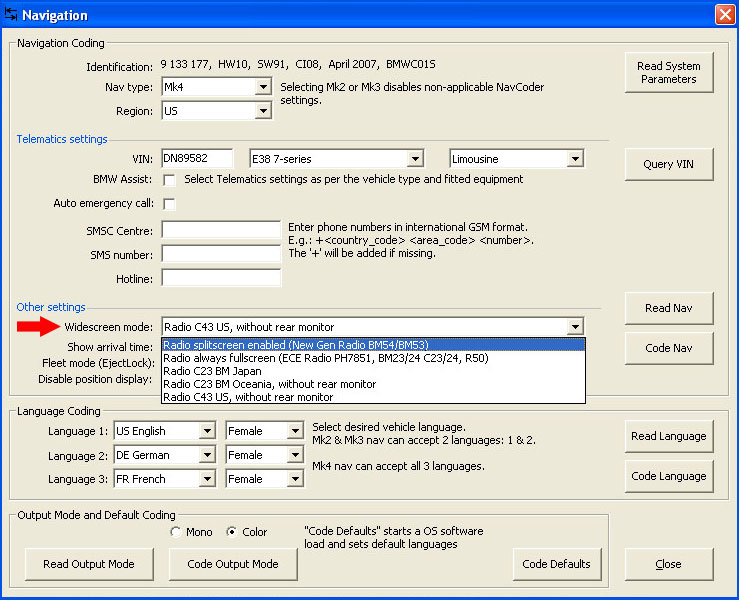
In the "Other settings" section, simply select Radio splitscreen enabled (New Gen Radio BM54/BM53). Then click "Code Nav" button. Done!
Optionally - while you're in there - verify the radio settings from Code > Radio:
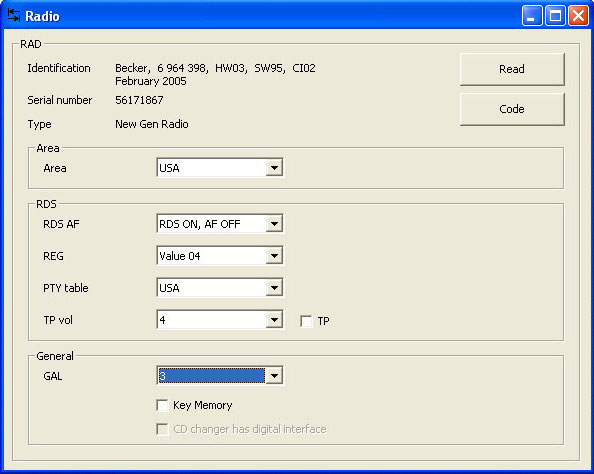
See Using Navcoder for a full explanation of options in each of the two dialogs above.
You're all done! Now pair your phone and start streaming that audio!