Aux Water Pump Rebuild
- Model & Year: 95-01 7-Series, U.S.
- Expertise: Intermediate
- Date: January 5, 2024
- Updated:
- Time Estimate: 4-5 hours
Tools Required
- Basic hand tools
Facilities Needed
- Work bench
Parts Required
- None
Getting Started
Does your heater fade away when at a stop? Does your car's interior fail to warm while idling on a cold morning? Do you have trouble bleeding coolant correctly? Most likely your auxiliary water pump has failed.
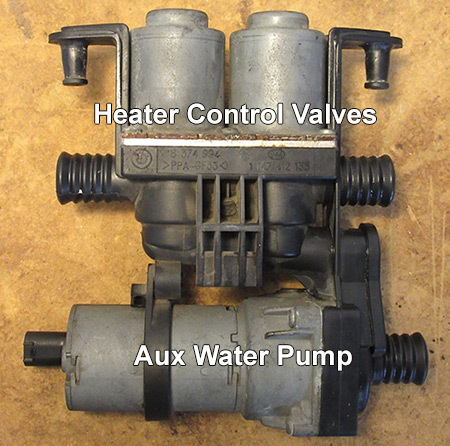
Hidden underneath the heater control valves (HCV) behind the engine, this mysterious pump circulates coolant when engine RPM is low. A failed pump is confirmed by fault code 2D in the IHKA module, and also by the lack of a faint hum at the HCVs with engine off and ignition in position 2.
With replacement pumps costing around $400, a rebuild is preferrable.
Problem Source
Like all electric motors, contact points become fouled as their brushes wear down over time, disrupting electrical continuity. The fix is identical to the process of repairing BMW window or sunroof motors: open the motor's case and clean its contact points.
Window Motors & Aux Pumps
To illustrate the commonality of this problem, compare Window Motor Repair procedure step 7 with step 5 below. Only because the assembly of a window motor is different from an aux pump was this DIY necessary. And yes, this repair applies to other BMW models such as E39, E53, etc.
Complicating this simple rebuild (other than extracting the pump itself) is pump reassembly. The motor's contact points must be held in a retracted position while the cap is reinstalled -- a detail jealously withheld by most online resources. Procedure step 8 below reveals the solution.
Procedure
To access the aux water pump, remove the HCV assembly by referring to the many online resources or Bentley service manual. Obviously, this is an ideal time to perform an HCV rebuild, if needed. '99-'01 cars: for better access, detach the brake booster vacuum line running in front of the HCV's.
Although draining the coolant beforehand is recommended, I found this step unnecessary since not much water is in the hoses (due to non-functional aux pump). Some water will drip from the HCV's, and the open hoses should be plugged (since water will drain as the car sits). Afterward, refill lost coolant and bleed system accordingly.
Pump Disassembly
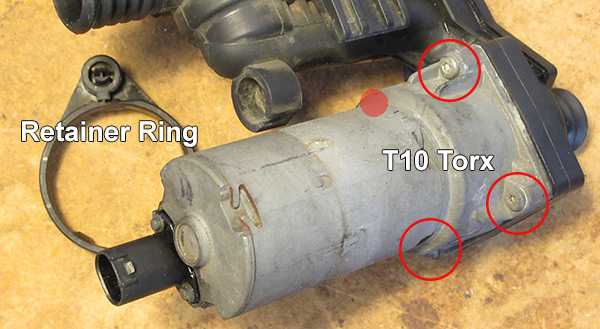
1) With HCV assembly in hand, detach retainer ring from around aux pump. Then remove the four T-10 screws holding pump to black frame:
2) Seperate pump impeller and shaft from motor case by pulling gently:

Incidentally, the impeller is a sealed unit which does not allow water to pass into the motor itself. The motor turns the impeller by magnetic induction.
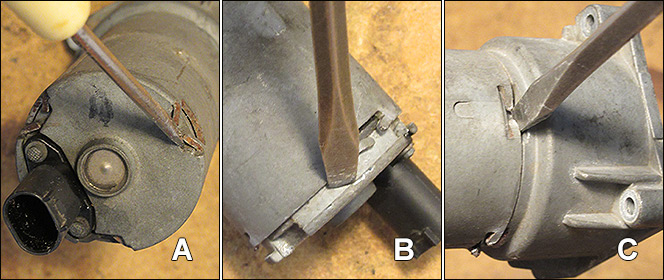
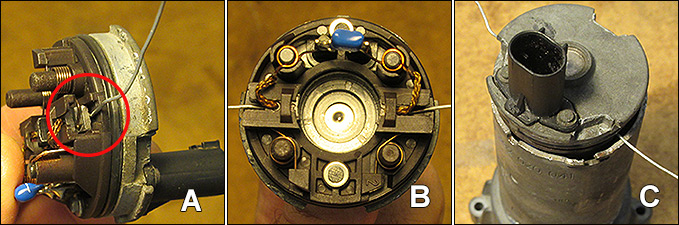
3) Remove end cap from motor case.
Case parts are staked into position. Use a small screwdriver to pry up the 3 stake points around end cap (panel A below). Working around circumference of cap, use a screwdriver to seperate (pry) cap from barrel section (panel B). Since the motor's end bearing is press-fit inside cap, it will take force to remove cap.
Once seperated, be aware of washer on end of motor shaft, which may fall out or otherwise be loose inside cap.
4) Repeat process to remove center barrel section from main motor housing.
This may be difficult since there's little room for a screwdriver blade. Force blade into stakes from front and pry strongly backwards (panel C above). This can result in deformation of stakes, which may get somewhat "chewed up".
Motor Refurbishment
5) Restore motor contact area:
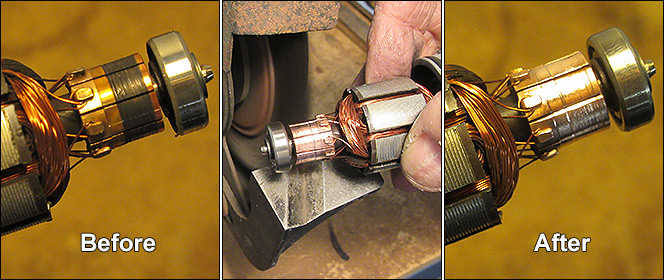
Use steel wool or wire brush to remove residue fouling motor's copper contact area. This residue may be quite thick. If available, a wire wheel power tool makes quick work of it (middle panel, above).
6) Use compressed air to clean all motor parts including cap, barrel, and motor. NOTE: magnets inside barrel retain worn contact material (black powder) and may be quite dusty. Be mindful of loose washer inside cap!
Pump Reassembly
7) Reinstall center barrel section:
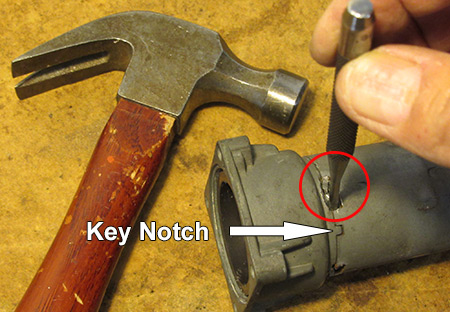
Re-stake using punch tool. NOTE: Case parts are keyed for correct installation. Verify alignment of key notch (see image above).
8) Reinstall cap:
Now the tricky part.
Contact points must be held in a retracted position in order for motor shaft bearing to pass into seat in cap. Wedge a thin wire underneath each point to retain them (panel A above). Panel B shows both points retracted and ready for installation.
Place washer on end of motor shaft bearing. Align cap with key notch and press onto shaft bearing by tapping with hammer until wires are pinched between barrel and cap (panel C above). Now withdraw wires, then hammer cap home. Remember, the shaft bearing is press-fit and will require force to seat. Hammer on center. Do not hammer cap's electrical connector!
Re-stake cap using punch tool. Finally, re-attach impeller.
9) Reinstall aux pump in reverse order.
Before reconnecting hoses to HCV assembly, test it. Attach electrical plugs and place ignition switch in position 2 (engine OFF). Listen for hum of aux pump operation (or place your hand on motor, feel for vibration). If you have a scan tool, clear fault code and verify.
Refill and bleed coolant system, this time correctly using your functional aux pump!