Window Motor Repair
- Model & Year: 97-03 5-Series
- Expertise: Intermediate
- Date: September 2014
- Updated: May 4, 2024
- Time Estimate: 4-6 hours
Tools Required
- T20 torx driver
- Inspection mirror
- Tweezers
- Small screwdriver and other pry tools
- Steel wool and/or wire brush
- Bentley or Haynes manual (optional)
Facilities Needed
- None
Parts Required
- None
Getting Started
Do you have a door window that fails to open and only makes a "click-click" sound? Do you have a door window that worked intermittently and has now stopped working altogether? You probably have an electric window motor that has fouled with age and is in need of repair.
The official repair procedure is to replace the entire window regulator along with the attached electric motor. This entails removing the window glass along with all door trim, amounting to a very time-consuming, full-service repair costing around $500 retail.
Others have correctly isolated the problem to the electric motor but, even though the motor is sold as a separate part, it cannot be replaced without removing the entire regulator assembly -- the same work as before. Some even proceed with futile attempts at electrical troubleshooting. But if your motor makes the "click-click" sound there's no need for that, since your motor is obviously getting power (otherwise there'd be no sound at all).
TIP: This repair applies to other parts such as the sunroof motor and auxiliary water pump.
Problem Source
The problem resides inside the electric motor. And, I've discovered it's serviceable in place! A free fix! Only the door panel needs to be removed for access. For reference, the window motor is shown below:

It consists of two seperable parts: 1) electric motor and, 2) mechanical gearbox. While the gearbox is attached to the window track/regulator mechanism, the electric motor is not. It's held to the gearbox by four T20 torx screws. Once separated, the motor's components are:
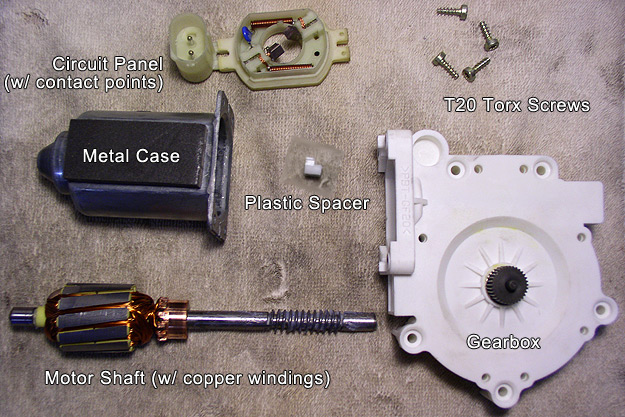
Inside the motor's metal case is the problem source: fouled contact points. These points are sometimes called "brushes" and are a common source of failure on electric motors. Specifically, the rotating copper contact area on the motor shaft becomes fouled with residue from the fixed contact points (brushes) as they wear down over time. Cleaning this area restores good contact and resolves the problem.
NOTE: The same window motors are used on all '97-'03 BMW 5-series but with different regulator (lifter) assemblies. The only thing that matters is accessibility to the motor. If the motor is not accessible, the regulator needs to be removed from the car to access the motor, but the repair procedure is still applicable. E38 7-series motors have gearboxes that must be disassembled before using this procedure.
Door Panel Considerations
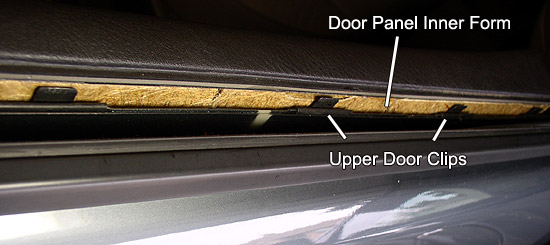
Perhaps the most challenging aspect of this repair is removing the door panel undamaged. The panel is held in the upper door clips by trim which is very difficult to remove. This is not mentioned in service manuals. In BMW parlance this trim is called the "waist rail trim strip" or "belt moulding" (image panels A & B below). It should be pried from the clips (with its attached weather strip) before panel removal (image panel C below).
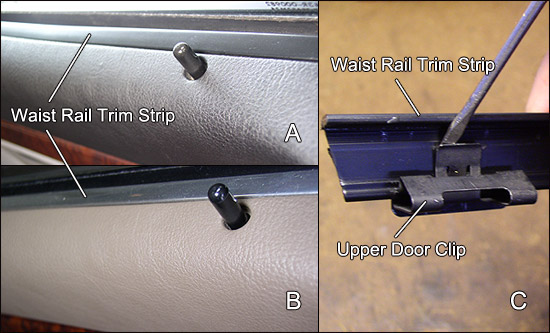
The door panel's inner retaining form has a ridge which fits into slots on the upper door clips. If the panel is forced off the upper clips without first removing the trim, the panel retaining forms may separate from the panel and have to be glued back on prior to installation. This is a very, very common failure point on BMW door panels.
At the same time, the white plastic clips which hold the remainder of the panel to the door are easily broken during handling. You may want to have spares on hand. And while the door moisture barrier must also be removed, any door airbags can remain untouched.
Procedure
Window Motor Repair
1) The window motor should be visible inside the door:
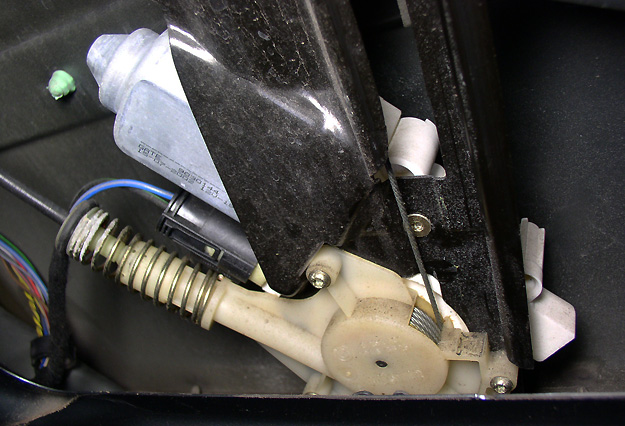
The motor will reside behind the black regulator frame and therefore be partially obscured. The motor's white plastic gearbox is screwed to the cable drive in front, with an attached electric plug. Remember, your car's set-up will vary depending on model year and door. (530i right rear door shown above.)
The objective is to access the silver metal case protruding from behind the regulator frame.
2) Unplug motor.
3) Remove the four T20 torx screws holding the motor's metal case to white gearbox. See image below (motor removed for clarity):

Visibility will be limited. Use an inspection mirror to help locate screws. Magnetize your torx driver to help prevent dropping screws as they're removed. If dropped, use tweezers to extract. A driver with flex shaft or u-joint may aid in accessing some torx screws.
4) Pull metal case off motor. You will now see the motor shaft with its copper windings.
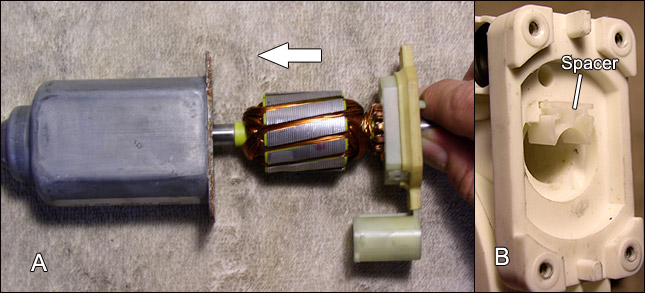
NOTE: Label the side of the metal case facing towards you. The case is the only part NOT keyed for proper installation. If re-installed "backwards", the magnets in the case will be 180 degrees out of phase, resulting in reversed motor operation. Ask me how I know!
5) Pull out motor shaft with circuit panel.
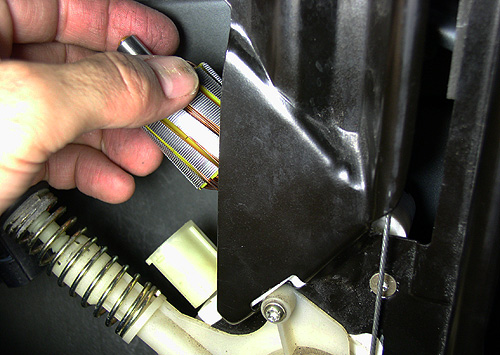
With window closed, the gearbox will be under tension. Hand-turn motor shaft counter-clockwise about 3-4 revolutions to release tension. See image above. When motor shaft feels loose, wiggle and pull it free from gearbox, along with circuit panel.
Locate the white plastic spacer if it has not come free with the motor shaft. An inspection mirror may help. If the spacer has fallen into the gearbox shaft, extract with tweezers. If spacer has remained seated in gearbox, leave it. Move components to lighted workspace.
6) Remove circuit panel from motor shaft.
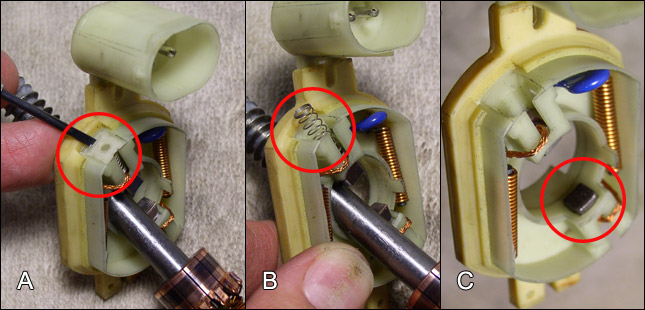
Using small screwdriver, pry out spring seats (panel A above). Remove springs (panel B above). With tweezers, push contact points back into their slots (panel C above). Slide panel off shaft.
7) Inspect and clean shaft's copper contact area:
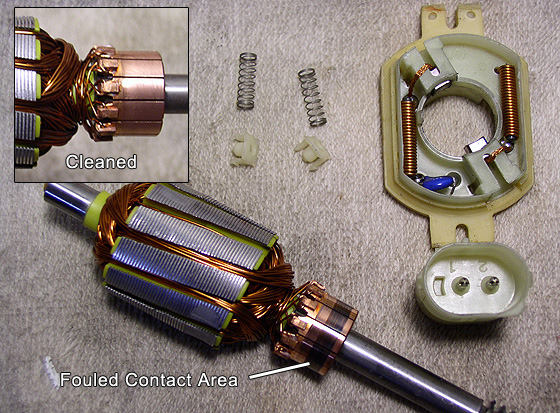
We've finally reached the heart of the problem. Using steel wool or equivalent, clean copper contact area on motor shaft. See image above. Clean also contact points and metal case, and any other dirty parts. If available, use compressed air. Done!
NOTE: Contact points are wear items. If under 1/8" length remaining, consider motor replacement. Such short nubs may become dislodged during reassembly (step 10 below), resulting in noisy motor operation. Ask me how I know!
8) Reassemble motor.
Slide circuit panel over shaft, up to contact area. Hold circuit panel in place while inserting contact springs and seats. Then, slide shaft with panel into metal case until panel seats against case. Verify motor shaft is resting on its axis in the case and that the case is correctly oriented (see note in step 4). See image panel A below:
Use a piece of tape on the case's flat sides to temporarily hold the panel (and motor) to the case.
9) Insert plastic spacer back into its slot on gearbox. Use inspection mirror to verify its position. Spacer fits flush with long side pointing into gearbox. See image panel B above (spacer shown only partially inserted).
10) Insert motor with circuit panel (held with tape to case) back into gearbox. So as not to disturb spacer, align motor shaft as much as possible with gearbox. Insert straight in until back of circuit panel joins gearbox. Secure with screws. (Tape can remain in place.)
11) Re-connect motor plug and test window operation. (Have a beer!) Window motor should "re-learn" its travel limits when pressing the auto up/down feature. If not, hold switch in both full up and full down position for 5 seconds. See Bentley manual for more.
12) Re-attach door panel - correctly! (See tips below.)
Re-attach moisture barrier and ensure black goo forms a water-tight seal around perimeter. Hold panel close to door and connect speaker wire; route window switch wire and underside courtesy light wire to their respective locations. Pull door handle thru.
Angle top of panel towards door and hang it from its inner form on the slots in the upper clips. (You did glue the seperating form back onto the panel, right?) See image above. Verify the center mounting clip is engaged by peering into the center of door from the side.
Working around perimeter of door, push in white door clips. Verify each clip aligns with its respective hole before applying force! Re-connect courtesy light and window switch. Secure handle with its torx screw.
Finally, install waist rail trim strip across top of panel by pushing downward, into the slots in the upper clips.
You're all done!