Window Regulator Rebuild
- Model & Year: 99-03 5-Series, U.S.
- Expertise: Intermediate
- Date: August 20, 2023
- Updated:
- Time Estimate: 3-6 hours
Tools Required
- Dremel power tool (or similar),
- Basic hand tools
Facilities Needed
- Work bench
Parts Required
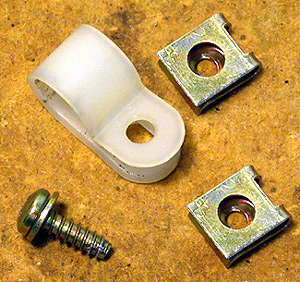
- (2) Small BMW screw clips
- (1) 3/8 Nylon cable tie or similar
- (1) Small screw w/washer
Getting Started
Don't buy new window regulators! Rebuild them for free instead!
Problem Source
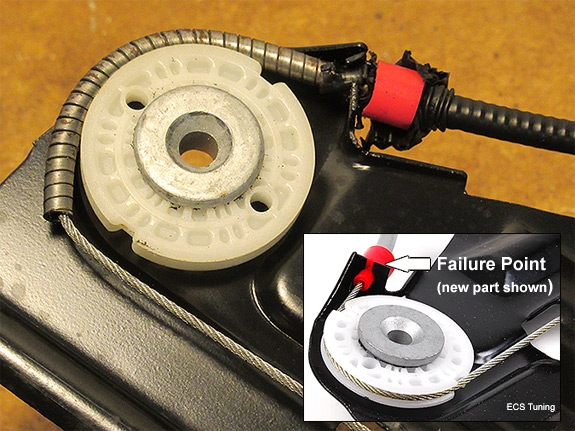
Unlike E38 7-series regulators which suffer failed pulley wheels, the problem on E39 5-series can be caused by aged plastics. Specifically, the regulator's upper cable sheath attach point. The red plastic holder can break, allowing the sheath to pass into the pulley causing it to jam:
Otherwise very well built, regulators on these cars can last decades. Even the rubber bumper end-stops, which prevent the "clunk" noise when windows reach the bottom of their travel, seem to last compared to E38.
Note:
- If your window was somewhat functional BEFORE you removed the regulator, the cable spool is likely operating normally. But not if the window was inoperative. If jammed, it will be necessary to re-spool the cable by removing the motor. While this adds time to the repair, the task is manageable but requires patience (procedure below).
- Check the window lockout switch on the driver's door panel. Make sure it is NOT engaged (window is enabled). It's beyond maddening to discover after hours of troubleshooting that your rear-door regulator doesn't work simply because of the lock-out switch! Ask me how I know.
Window Motors
Electric window motors can fail due to fouled internal contacts. This is an ideal time to preemptively clean those contacts. See Window Motor Repair for instructions.
Solution
A generic BMW screw clip can serve to replace the broken sheath retainer. The sheath itself needs to be secured by a common cable tie, to guide the cable through the clip. Just as important, it's possible to rectify a jammed cable spool (and clean the motor's contacts). In this way, you can effectively rebuild your entire regulator without resorting to questionable aftermarket alternatives!
Failure Modes
This DIY focuses exclusively on the failure specified. Others may be possible. They will be addressed as warranted by experience. Regulators in this procedure are in cars from 4/99-on. Older parts may be similar.
Procedure
The left rear door of a 1999 528iT is the subject of this procedure.
Prep Work
1) Inspect regulator to confirm failure mode. Also inspect pulley(s) and rubber bump-stops.
2) Verify whether cable spool is jammed.
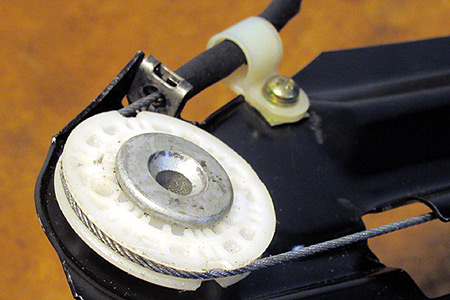
Peer into the spool opening. The cable should be neatly wound. But if cable is overlapped or protruding, it's jammed. (Another indicator occurs when installing the cable onto the pulley after repair. If there is not enough length to extend the cable over the pulley, it's jammed.)
3) Re-spool cable as necessary.
4) Optional but recommended: Rebuild window motor by cleaning its contact points. (See: Window Motor Repair)
Regulator Rebuild
5) Using a trim saw or Dremel tool, cut away failed sheath retainer. Then remove any bunched plastic on the metal sheath around the failure point.
6) Notch the open end of a BMW screw clip using a Dremel tool or similar. This notch provides a cable passthru:

7) To prepare regulator for the repair, the sheath tension spring needs to be fully compressed. This first requires the cable guide clip be extracted from the white plastic spool housing and slid completely upwards toward the black retainer cap:
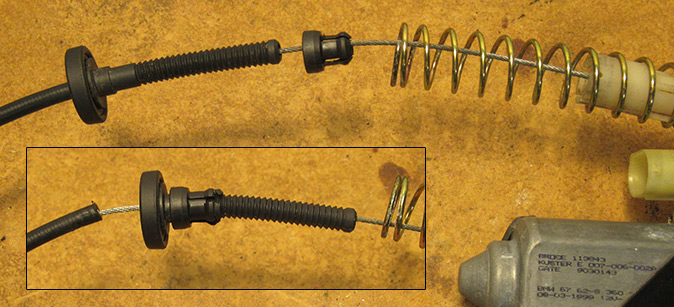
Now loosely insert the black retainer/guide into spring, and seat the spring over spool housing.
8) Improvise a spring compression method, such as employing a pair of clamps positioned over the black retainer cap, while holding the regulator frame in a bench vise:
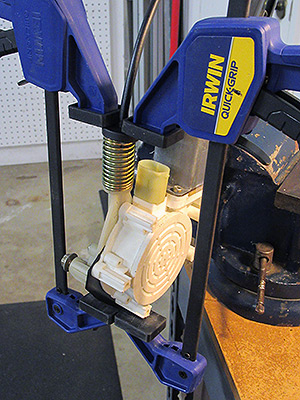
Otherwise use a helper to hold the spring in a compressed state while the repair is completed. Be sure to guide cable into spool housing as spring is compressed.
9) With spring fully compressed, position cable over pulley wheel.
Verify cable is properly routed thru and around regulator frame. As previously noted, if there is not enough slack to extend the cable over the pulley, the cable is jammed in the spool.
10) Now insert screw clip over cable and position it snuggly onto regulator frame. Be sure to face the small opening of clip towards the spring. This prevents the sheath from passing, while the spring tension holds clip against regulator frame.
11) Slowly release spring tension. Verify cable routing.
12) Wrap exposed section of metal sheath to prevent rust.
13) To guide the cable through clip and secure the sheath, drill and deburr a small hole in regulator frame near clip for placement of a common cable tie:
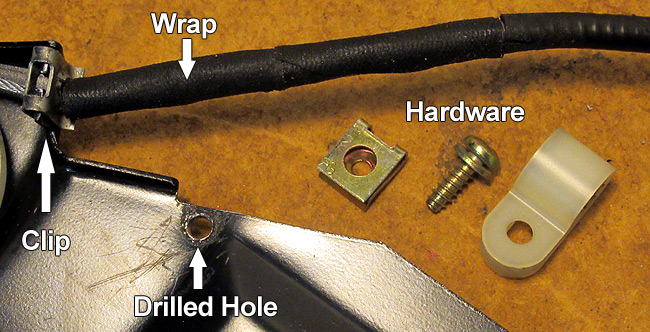
Use a drill press if possible, for accurate results. The hole size should of course match the size of screw to be used.
14) Secure sheath using cable tie hardware, tightened securely to regulator frame:
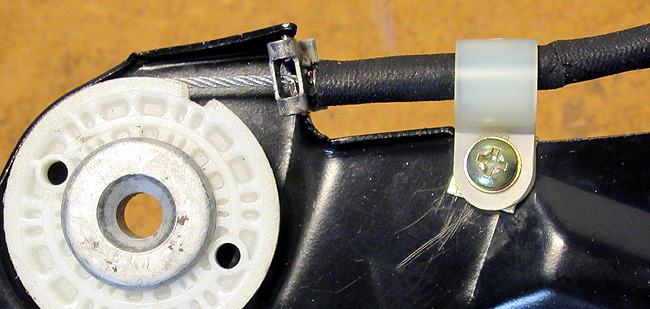
If you wish, wrap additional material around sheath to secure it snuggly inside cable tie.
All done!
Before installing the glass, test the regulator. Run it up and down. It should run smoothly and quietly. (For rear windows: Is your lock-out switch turned off?)
You just saved yourself a lot of money! Now use your window with confidence!