Window Regulator Rebuild
- Model & Year: 95-01 7-Series, U.S.
- Expertise: Intermediate
- Date: January 19, 2018
- Updated: March 28, 2023
- Time Estimate: 8-10 hours
Tools Required
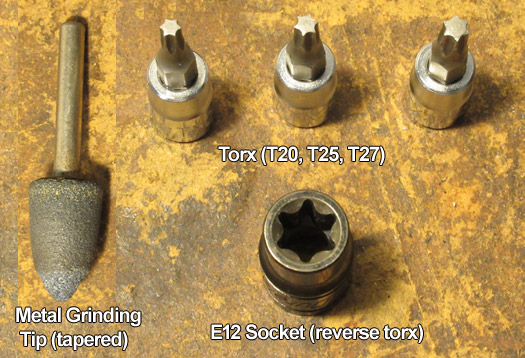
- Drill press with metal grinding tip (tapered)
- Torx bit set
- E12 socket.
- Basic hand tools
Facilities Needed
- Work bench
Parts Required
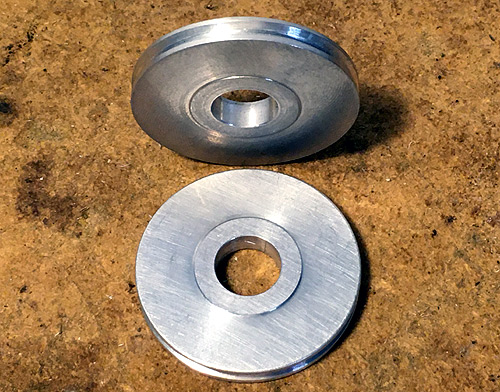
- (1) Metal pulley wheel: Contact me, price: $35 each ($60/pair), U.S. shipping: $8.
- Rubber bump stops: p/n 51-33-8-257-714, $6.84 (each, list).
- Washers (Size: 7/16).
Getting Started
Don't buy new window regulators! Rebuild them instead!
Problem Source
On the E38 7-series, regulator failure is typically caused by broken pulley wheels. These pink-colored wheels guide the cable around the regulator frame. Front windows have 4 pulleys (2 upper, 2 lower) while rear windows have 2 pulleys (1 upper, 1 lower). However, in my experience, it's not necessary to replace every pulley. Why?
Because only upper pulleys fail. This is due to the taut cable joining the upper pulley at an angle offset from its plane, causing it to bend and break over time. By contrast, cable forces on the lower pulleys are inline with their plane. (On front windows, the upper pulley by the outside door handle fails.)
On the rear window regulator shown in panel A below, the upper pulley is completely broken away from its axis post, while the bottom pulley (panel B) is in good condition.

Additionally, many regulators have failed bumper end-stops. These rubber bumpers prevent the "clunk" sound when windows reach the bottom of their travel. In panel B above, note the broken and failing bumper (left of pulley). In some cases, the bumper may be missing entirely.
After pulley failure, the loose cable may jam in the cable spool. If not, the window will remain somewhat functional but, continued operation will certainly cause the cable to cross in the spool resulting in terrible noises (sounds like the motor "chewing up" the cable). These awful noises alone are enough to fool people into replacing the entire regulator.
Window Motors & Cable Spools
Electric window motors sometimes fail due to fouled internal contacts. This may be a good time to preemptively clean those contacts. See Window Motor Repair for instructions.
Cable spools on E38 7-series are considered part of the motor, while spools on the E39 5-series are separate. This is probably why motors are available as a separate part only for the E39, while sold only with a complete new regulator for the E38.
If your window jams in the closed (up) position, it will block access to the regulator mounting bolts -- an issue not addressed in service manuals or otherwise helpful YouTube videos. If this occurs on a rear window, verify that someone hasn't engaged the child lock-out switch before proceeding (doh!). See this thread for a helpful tip if your window is stuck closed. On the other hand, if your window jams fully open (down), regulator removal is not impaired.
Solution
Thankfully, it is possible to replace your broken pulley wheels with stronger metal pulleys. Just as important, it's possible to rectify a crossed cable spool (and clean the motor's contacts). By finishing with new bumper end-stops, you can effectively rebuild your entire regulator! Compared to the cost of a full service repair, this can save you well over $500...and last longer!
Upper vs Lower Pulleys
For reasons cited above, this DIY focuses exclusively on upper pulley replacement. If your lower pulley has failed, this replacement procedure is only partially applicable.
Machine Work
The upper pulleys are mounted on an axis post pressed into the regulator frame. Re-using this sturdy post should be the goal (versus drilling it out). However, the post has a flanged end which retained the stock pulley (see inset image below). This flange needs to be ground away (machined) in order to allow the post to receive the new metal pulley:
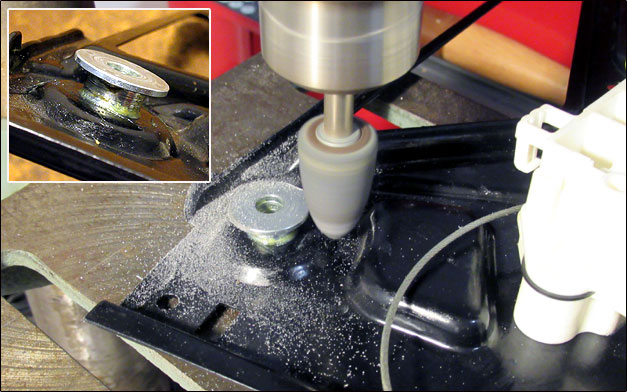
Use a drill press with a tapered grinding tip to access the entire circumference of the flange without interfering with the black regulator frame. A washer will replace the flange and act as a spacer. Once the regulator is re-installed, the new metal pulley will be retained between the regulator frame and the post's upper mounting point inside the door cavity (as before).
Procedure
This DIY assumes your window is still functional. If otherwise, special instructions will be noted. The right rear door of a 2001 740i is the subject of this procedure.
Door Prep
1) Remove door panel. (See Bentley service manual for details.)
Performing this task without damaging the panel may be the most difficult part of this procedure. It may be a good idea to have spare door clips on hand (to replace the broken ones).
2) Remove black vapor barrier.
Begin by unplugging and removing door speaker box. Then, remove mounting bracket for exterior door handle light. See image below. Free the door wiring harness by snipping the cable ties securing it to the two fastners. This reveals the plastic rivets securing the fastners to the door. Pry out and remove the rivets to release the fastners. Then pry out the yellow rivet holding the door lock cable, and release its screw.
Do not attempt to remove the lock pull lever. It's plastic fastner (screw) is brittle with age and is liable to break (ask me how I know). Instead, leave it in place and use scissors to cut open the vapor barrier surrounding its mount point. Finally, pull out regulator access plugs.

With impediments free, begin pulling vapor barrier from upper corner while also working lower corner. Try to keep the black goo off your hands.
Window Removal
Steps 3-4 below are for rear windows only. Front windows are not retained by door trim and can be removed by simply lifting the glass up (after releasing its two retainer clamps).
3) Remove exterior, quarter window trim strip.
With interior quarter window trim removed (or quarter window shade), release the three now-visible screws to release exterior trim.
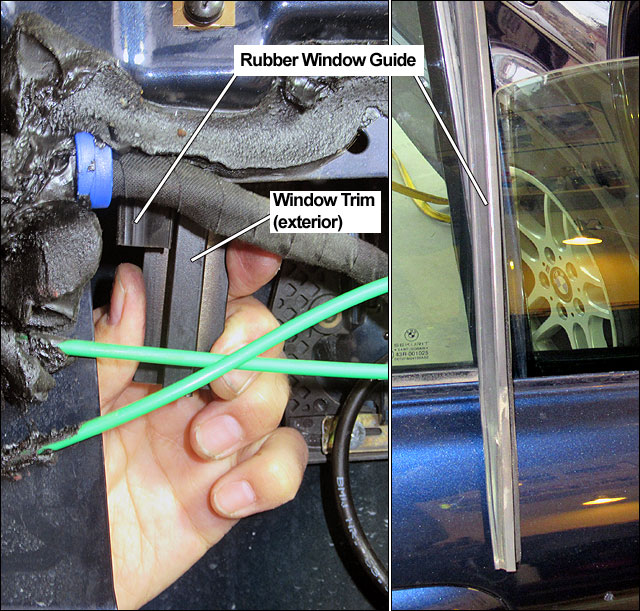
With window partially or completely closed and using rubber gloves for additional grip, push down on exterior trim strip until it's partially visible inside door cavity. Reach up inside cavity to grab end of exterior trim. Pull strongly downward to remove. Be careful not to grab rubber window guide along with trim, as they are located together. See image below, left.
For non-functional, open windows: Using rubber gloves for extra grip, apply strong downward pressure to exterior trim until it's about halfway down. Now, pull strongly upward while pulling top of trim outward to clear exterior door frame, thus removing the trim from outside.
With exterior trim strip removed, pull up on loose rubber window guide until it clears the door. See image above, right.
4) Lower window halfway. Remove window retaining bolt using T25 torx (image below). Remove window.
For non-functional, closed or partially closed windows: Access retaining bolt thru upper door opening or, insert T25 bit then turn with pliers from below.
Pull gently upward on window while working it toward the outside of door, toward loose window guide. If window is stuck closed (up), be sure to read specified forum thread in Getting Started above. Set window aside in a safe place!
Regulator Removal
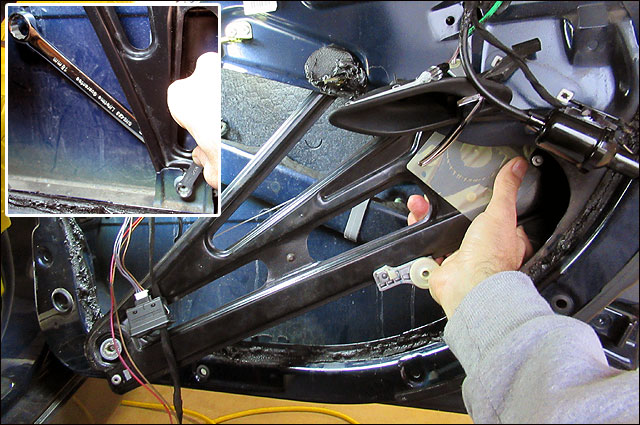
Step 6 below is for rear door regulators only. Front door regulators are retained by six bolts: 3 upper, 2 lower, and 1 center.
5) Unplug window motor by reaching up inside door cavity.
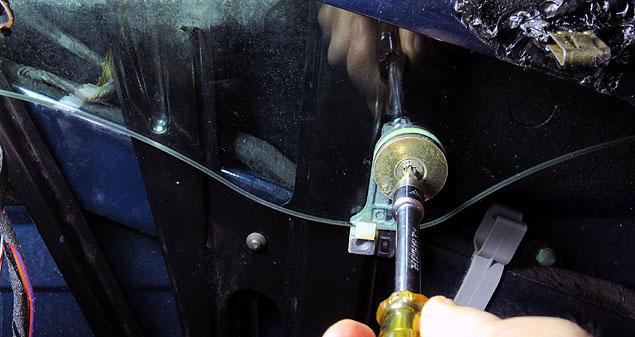
6) Using an E12 socket (or E14), release the two upper regulator mounting bolts (thru door access holes). Then, loosen (don't remove) the lower regulator mounting bolt using 10mm box wrench (counter-hold opposing nut with 18mm wrench, if necessary). See image below, inset.
Extract regulator from door cavity; move to work bench. See main image above.
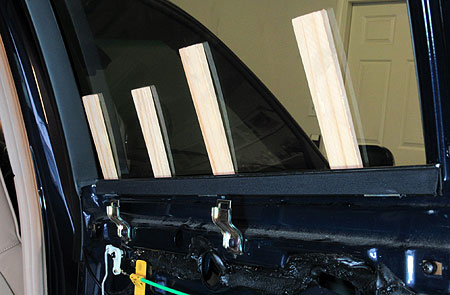
TIP: To keep your car drivable while performing this procedure, return window to door and use common wood shims inserted between the inner seal and glass to hold the window closed. It may look strange but believe me, your window won't budge!
Regulator Rebuild
We have finally arrived at our objective. You can see why this job is such a PITA.
7) Inspect regulator for failed pulley(s) and rubber bump-stops.
It's likely you will find the lower pulley(s) functional while only one upper has failed. Therefore, this DIY focuses exclusively on the upper pulley.
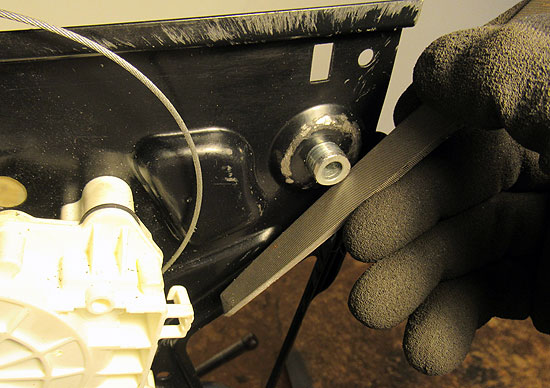
8) As discussed in Getting Started above, prepare upper pulley mounting location by grinding away the flanged end of the axis post. It's not necessary to grind flange until it exactly matches the diameter of the post. Some "slop" is okay.
Test-fit new metal pulley on post at various intervals during machining. When fit is approximate, remove any remaining material by hand with a metal file, as in image below:
To prevent rust, spray black paint on the scratched or worn sections of regulator frame surrounding the newly machined post. (Scratches visible in image above.)
Steps 9-12 are necessary only if the cable has jammed or crossed in the motor. If your regulator has not yet begun making horrible crunching sounds, then your cable is still spooling correctly.
9) Remove window motor and cable spool.
Using a T27 torx, remove the four motor retaining screws. Separate motor assembly from regulator frame. Then, pull cable spool from motor drive. If cable has jammed, pry the spool free with a screwdriver. See image below:

With motor removed, the cable trolley may also be removed from the regulator frame by sliding it up and off, to simplify the following steps.
10) Optional: Rebuild window motor by cleaning its contact points. (See: Window Motor Repair)
11) Re-spool both cables.
With spool in hand, unwind the two cables and remove both from their anchor points. Note the spool has grooves on its surface to receive each cable, similar to threads on a screw. Re-anchor the cables on each side, and wind each two revolutions around the spool by nesting them inside the matching grooves. The result should look like:
This requires patience and may take several trial-and-error attempts. Be sure spool is oriented correctly to receive the motor drive gear.
12) Re-attach spool to motor drive, then secure motor drive to regulator frame.
To take up cable slack, loop cable over upper pulley post and position spool back into motor drive. (Or, ask a helper to keep cable taut.) Verify cables exit motor drive thru the correct slots. Then, secure motor drive to regulator frame.
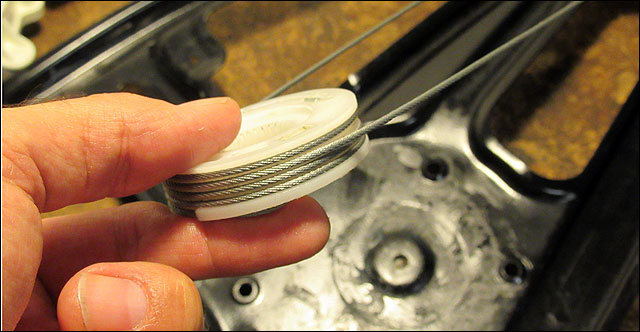
13) Now slide new metal pulley onto upper axis post.
Lubricate axis post with lithium grease or similar. Then employ a screwdriver inserted from underneath the post to lever the new pulley, with attached cable, into position:
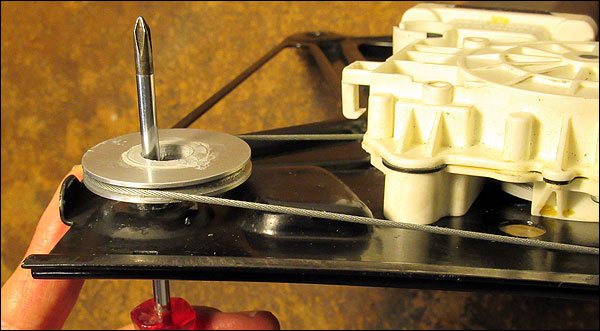
14) A 7/16 washer will install onto the end of axis post to serve as a spacer. However, save this step until just before regulator installation. Grease applied between washer and pulley will tack it to the pulley, keeping it attached while handling the regulator during installation. The resulting combo will look like:

In main image above, it should be clear why upper pulleys fail: the cable is not aligned with the plane of the pulley. This results in a constant bending force on the pulley. Since the cable is quite taut, this force must be considerable.
However, the same arch of the upper regulator frame which results in this pulley-to-cable misalignment works to hold the new pulley on its axis post without an additional retainer -- for now. When the regulator is installed, the end of the post adjoins a bracket inside the door cavity, effectively closing it off.
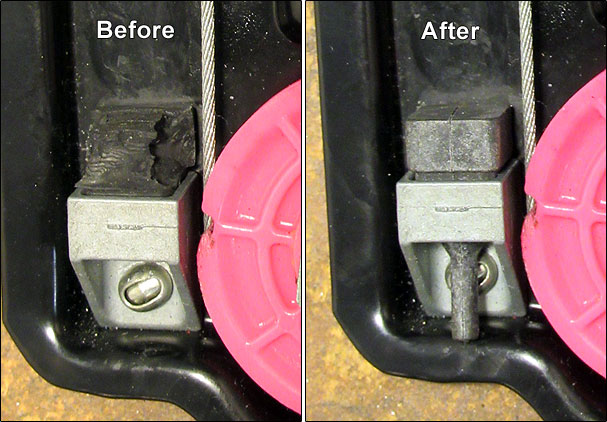
15) Front Windows: Verify all cable sheath retainers are correctly seated in regulator frame. Often, the pink retainer is broken and allows the metal sheath to pass thru, which will eventually jam the pulley (ask me how I know!):
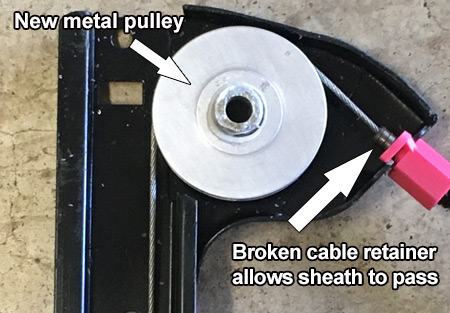
Using a small BMW screw clip, notch the bottom with a Dremel tool or similar, to insert the cable. Then attach clip to regulator frame as shown:

16) Finally, pull out failing bumper end-stop and replace with new:
Congratulations: you successfully rebuilt your window regulator!
Re-installation is reverse of removal noting the following:
- Before installing the glass, test the regulator. Run it fully up and down. It should run smoothly and quietly.
- When reinstalling the exterior quarter window trim (on rear doors), apply a soapy water solution to the rubber seal to aid installation. Install trim strip starting from outside. Proceed slowly. The trim strip can tear the rubber window guide if not inserted correctly.
- Don't forget to install the 7/16 washer on end of pulley axis post before regulator installation. To prevent the loose washer from falling off while regulator is positioned inside the door cavity, apply a generous amount of lithium grease (or similar) between it and the pulley (as suggested in step 14 above).
Now use your window with confidence!