Does your sunroof jam or drag? Have you replaced parts in your sunroof only to find they've failed again? If so, it's possible to remove some moving parts in order to simplify sunroof operation and keep these headaches from re-occurring - all at little or no cost!
The above mentioned problems are entirely related to ceiling liner movement, NOT sunroof panel movement. Typically, the trolley gears which control liner movement fail. This in turn causes the trolley gear to skip teeth of the liner's toothed racks and slide rail hardware. The liner then falls out of adjustment, tracks unevenly, and jams.
Replacement parts from BMW won't be available forever, and parts left may actually be "new old" stock. While an ideal solution would be a more robust trolley gear system, here are two simple methods to make your life easier:
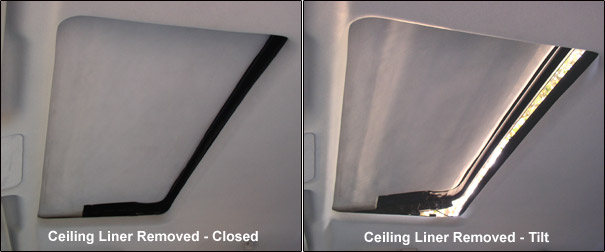
Method 1 - Ceiling Liner Removal : Simply remove your ceiling liner along with its toothed racks for a quick and easy solution. The roof's underside liner will keep things looking mostly factory-like. See images below. There is little difference in road noise with liner removed and roof closed, and only slightly more wind noise (but much more airflow!) in tilt position.
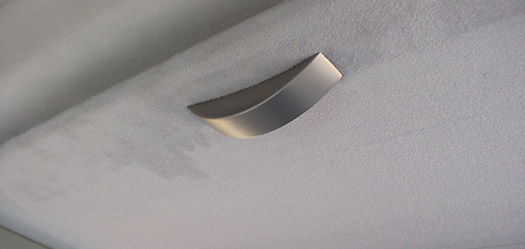
Method 2 - Manual Ceiling Liner Conversion: For those who prefer the look of a ceiling liner, simply remove the toothed racks as above and add a suitable grip handle to the liner. See image below. You must also slightly modify the rain gutter and ceiling liner to provide extra clearance for both to move freely.
With manual control:
Liner moves freely with roof in closed or tilt position, but pinches between roof liner and slide track when roof is in motion and fully open. This is normal, but makes liner difficult to move by hand in these cases. Therefore it's best to slide liner BEFORE opening roof and AFTER its closed. Tilt not affected.
In tilt, the driver can move liner to any position to suit his need for airflow/quietness.
With roof and liner closed, liner pinches snug between roof liner and slide track, which prevents it sliding open. Likewise, with roof and liner open, liner is pinched to prevent it sliding closed.
You will be amazed how smooth and quiet sunroof operation will be without the liner's problematic moving parts!
If you'd prefer to repair your sunroof with new parts, see Sunroof Rebuild.
Procedure
Ceiling Liner Removal
1) Tilt sunroof by pushing up on switch.
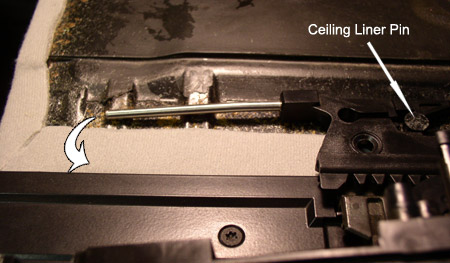
2) Reach into partially retracted ceiling liner near the outer edges and feel for the liner's metal release rods. Press gently outboard to release ceiling liner from pin. See image below (panel removed for clarity). Push liner fully rearward.
3) Using T-25 torx, remove the 3 now-visible sunroof panel screws on inside of each lifting gate arm. Lift panel out; set aside.
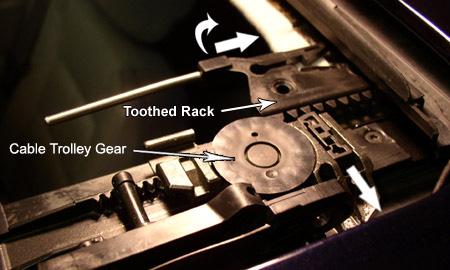
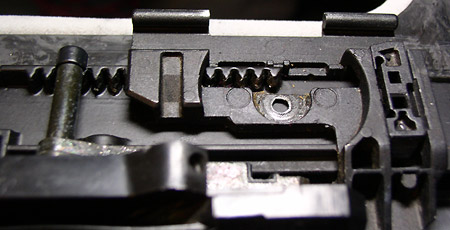
4) From "tilt" position, remove toothed racks by pulling up on outer edge (to clear cable trolley gear) while pushing rearward. Slide rack off rear of trolley base while pulling out lock pin. See image below:
If your trolley gear is worn and failed, the racks may simply slide free, or require only minimal persuading.
5) From its open position, pull ceiling liner forward while lifting to clear slide rail slot. Remove liner. Done!
Manual Ceiling Liner Conversion
1) Remove ceiling liner and toothed racks as shown above.
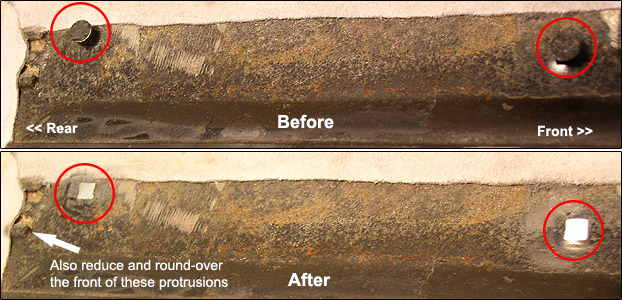
2) In order to provide clearance for the rain gutter, the now-useless ceiling liner pins need to be removed. There are 4 total (2 each side). See images below. A Dremel with metal cutting wheel works perfectly. Smooth area with sandpaper. Also, round-over front of rear corner protrusions.
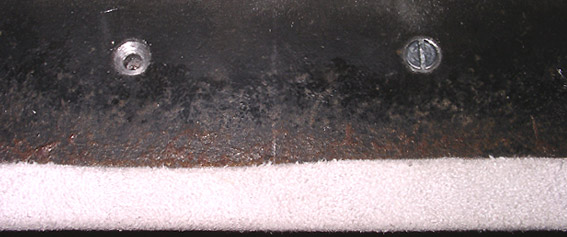
3) Install a grip handle on ceiling liner. Use either common cabinet hardware or a handle from another car type. Countersink screws on top:
Drill screw locations about 1-1/2" from front of liner. A drill press will provide more accuracy than a hand-held drill. Liner has a metal core wrapped in a rubber-like outer layer (note exposed metal in left screw hole in image above). Short screw lengths are needed (about 1/2") and must be flush with upper surface (see right screw in image above).
TIP: Home supply stores (such as Home Depot, Lowes, etc) stock a great selection of drawer handles in satin (for grey interiors), bronze (for beige interiors), or black. Use 1/2" machine screws, size: 8-32.
4) Finish modified liner by applying flat black paint to the exposed metal areas of removed pins (and handle screws) to prevent future rust. Clean upper surface. Let dry.
5) The rain gutter's center roller wheel and bumper need to be removed to provide clearance for the ceiling liner. Remove rain gutter starting with sunroof mechanism in open position:
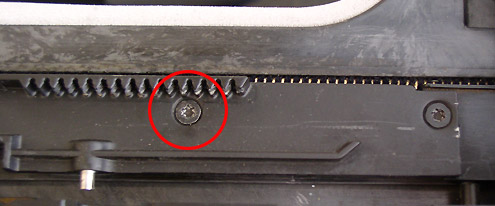
a) On each slide rail, remove T-15 screw specified in image below. Then, close sunroof mechanism.
b) Detach gutter from lift arms by pressing outward on the wire gutter arms.
c) Remove slide rail's 4 remaining screws. Note screw lengths and positions. Lift slide rail (with attached trolley gear) and remove gutter.
6) On workbench, remove gutter's roller wheel by first removing axis pin, then remove plastic material with a rasp or file. Reduce plastic but leave enough material to "skid" over ceiling liner. See images below:
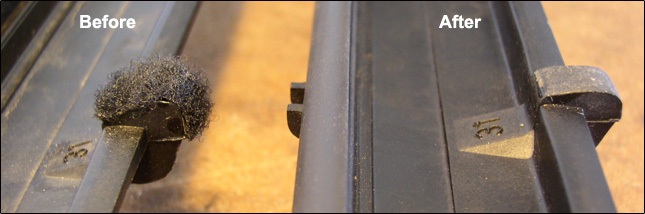
7) Similarly, file down center upper bumper by first peeling off "afro" tape. See image below:
8) Re-install modified rain gutter in reverse order, then install modified ceiling liner with handle, and then roof panel. Now enjoy reliable sunroof operation!
TIP: To level roof panel, begin from inside the car by pushing up 1/2" on the rear and tighten rear torx. Then press down from outside on front of panel and tighten front torx. Then tighten center torx.
Note:
Since roof panel's liner will now slide over the top of ceiling liner, clean top of ceiling liner before re-installation.
Verify roof panel liner condition before re-assembly. If fabric is separating, use Elmer's glue spread with a small brush to re-attach fabric.
For an even better installation, break off the weak (and probably defective) trolley gears by either applying downward finger pressure to the outside circumference (over roof opening) or use pliers. Removing the gears will eliminate clattering noises, reduce motor resistance, and take the now-useless gears from sight. See image below:
Since liner pinches between slide track and bottom of roof liner when roof opens, slide liner open before opening roof and then after it's closed, for easier liner control.
Liner moves freely when roof is closed or in tilt position. Position it as desired when tilted.