Sunroof Rebuild
- Model & Year: 91-97 8-Series
- Expertise: Intermediate
- Date: November 2009
- Updated: June 3, 2013
- Time Estimate: varies (2-3 weeks)
Tools Required
- T-25 torx
- Basic hand tools
Facilities Needed
- Work bench
- Garage (for dry, secure storage)
Parts Required
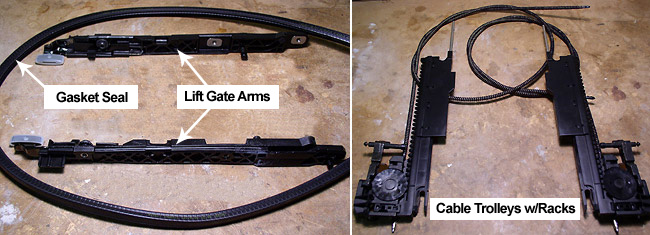
- Lift Gate Arms (L/R), p/n 54121940965/6, $41.74 list (each)
- Cable Trolley (L/R, with toothed rack), p/n 54121940975/6, $113.58 list (each)
- Gasket Seal, p/n 54128108334, $94.36 list
- Professional paint match for panel, $200-$300
Optional:
- Sunroof Panel, p/n 54128152848, $331.26 list
- Slide Rail (L/R), p/n 54138108887/8, $27.49 list (each)
Getting Started
Does your sunroof have rust spots? Does it jam or drag when operating? All of the above? It's rebuild time.
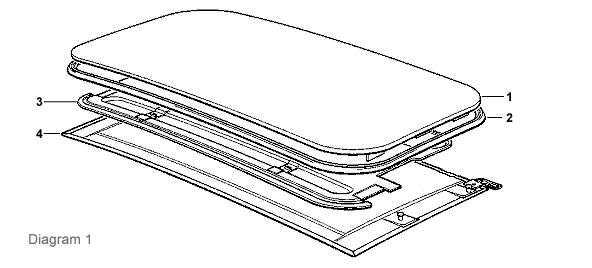
Rust. The 8-series' sunroof panel (#1, diagram 1) is constructed of two metal sheets mated together with the assistance of staple joints every 4-5 inches along the outer rim. A formed U-shaped gasket seal (#2, diagram 1) attaches to the panel, which deteriorates over time and traps water at the bottom. When the water soaks the staple joints, rust develops. This explains why rust is typically found every 4-5 inches along the edge. There are two possible solutions:
1) New panel > professional paint match > new gasket - Instantly eliminates all rust but expensive. Complicating this is the adhesive trim on the panel's underside (#3, diagram 1). This trim serves to hold down the ceiling liner (#4, diagram 1) and covers the panel's unsightly underside in tilt position. It's outrageously expensive to replace (list $693.39) and needs to be re-used, if possible, in order to keep costs down. Perform all panel installation work yourself for more savings (procedures below).
2) Refurbish panel > professional paint match > new gasket (recommended) - More affordable/practical. Use a professional auto body shop. DO NOT use factory touch-up paint to cover treated rust damage (this looks bad and will not last -- ask me how I know!). This method leaves the expensive trim undisturbed (#3, diagram 1). Simply remove old gasket seal, then cover and tape trim before delivering panel to your favorite body shop (expect $250-$300). Perform all panel removal and installation work yourself (procedures below).

Jamming/Dragging. These problems are all related to the sliding ceiling liner (#4, diagram 1). The plastic toothed racks (#1, diagram 2) which control its movement can fail or skip teeth, causing uneven tracking. However this probably means the main cable trolleys with integral gear (#2, diagram #2) are failing, causing additional wear on the teeth of the metal slide rail (#3, diagram 2). Even the main lifting gate arms may crack (#4, diagram 2) potentially causing alignment issues. The only repair is parts replacement.
Sunroof Simplification: Almost all sunroof movement problems are related to defective trolley gears, which control the ceiling liner. Eliminate these parts and never be troubled again! See Sunroof Simplification.
You will not know the extent of the problem - nor the parts to order - until you remove the sunroof and ceiling liner (see procedures below). This is a good project to pair with a headliner replacement, if applicable. However it is not necessary to remove the headliner for this work. Attach a battery charger or disconnect batteries while your car is down, for battery health.
I recommend avoiding professional BMW specialists for panel removal/installation or any repair of the sunroof mechanism. Most shops are unknowing and regard this work as trivial -- and will treat it that way. Instead, assume the responsibility yourself. You'll thank me later.
NOTE: your car will be unusable for the duration of the repair (unless you don't mind driving with a missing sunroof). The replacement parts specified are typically not stocked by dealers and will have to be ordered, delaying repairs.
TIP: If your sunroof has jammed completely and is now "out of sync", unplug the sunroof switch briefly to re-set. Or, use the special sunroof wrench (in your trunk tool kit) to turn motor directly. From the fully closed position, press up on switch (tilt) and hold 10 seconds for additional calibration, if necessary.
Procedure
Sunroof Panel Removal
1) Tilt sunroof by pressing up on switch.
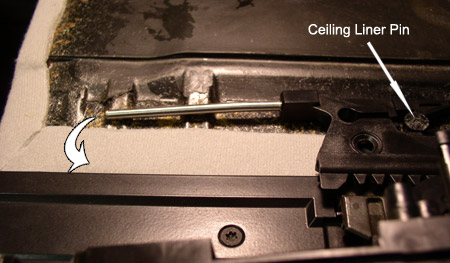
2) Reach into partially retracted ceiling liner near the outer edges and feel for the liner's metal release rods. Press gently outboard to release ceiling liner from pin. See image below (panel removed for clarity). Push liner fully rearward.
3) Using T-25 torx, remove the 3 now-visible sunroof panel screws on inside of each lifting gate arm. Lift panel out; set aside.
4a) You may now begin taking inventory of replacement parts needed. Begin by inspecting the plastic toothed racks for breakage. See image below (racks & covers removed for clarity):
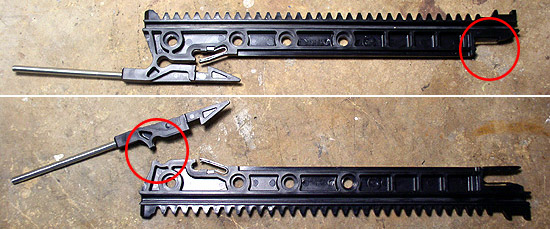
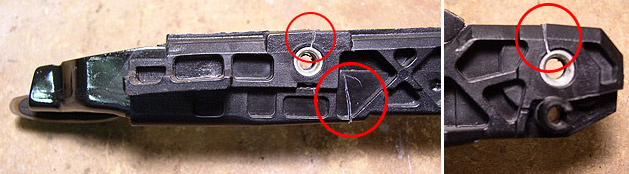
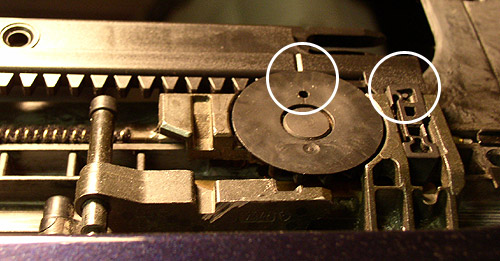
4b) Then inspect lifting gate arms for cracks. See image below (arms removed for clarity).
Ceiling Liner Removal
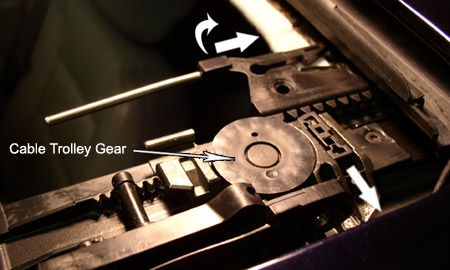
5) From "tilt" position, remove toothed racks by pulling up on outer edge (to clear cable trolley gear) while pushing rearward. Slide rack off rear of cable trolley while pulling out lock pin. See image below:
6) Slide loose ceiling liner fully forward. Then, fully "open" sunroof (stay clear of moving parts).
7) Slide liner rearward to clear slide rail slot, then pull forward while lifting. Remove liner.
Alternate Method: Re-attach liner to toothed racks; close sunroof; detach rain gutter and pull it forward, clear of roof; detach liner and slide fully rearward; pull up on liner and pull out between rain gutter and toothed racks.
NOTE: DO NOT operate sunroof with toothed racks in place and ceiling liner removed (the toothed racks will snag and break on support frame - ask me how I know). DO NOT allow rain gutter to completely "run over" loose ceiling liner. Keep liner in front of rain gutter when operating motor. DO NOT open sunroof with rain gutter detached from gate arms.
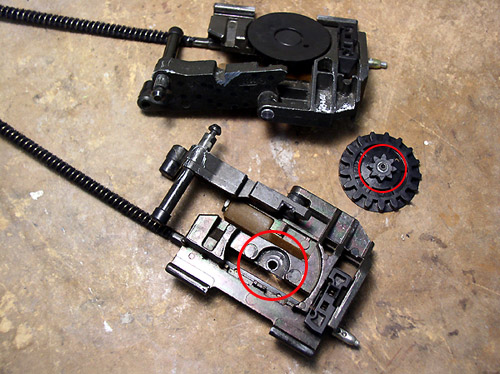
8) Return sunroof to "closed" position. Lift up on inside edge of trolley and attempt to turn gear firmly by hand. Any gear slippage means either cable trolley or slide rail needs replacement, or both.
The trolley gear's vertical axis wears out, no longer fully meshing with toothed rack, resulting in slippage. Complete breakage can occur (see image below). If toothed racks skip teeth of cable trolley with ease (in closed position), the trolley gear has failed. Clattering noises upon tilt/close are indicators too. Look also for metal shavings on slide rail teeth at rear. If excessively worn, replace slide rail. Note steps 10(a) and (b) when re-installing.
9) Remove old gasket seal from sunroof panel. Don't be surprised if water drains as you remove seal. Don't be fooled by rust-colored gasket sealant used by the factory. Sunroof rust should be limited to staple joint area. Assess rust damage carefully.
10) At this point you should have enough information regarding replacement parts needed. Order parts. Decide which sunroof panel repair suits your budget. Upon installation, note the following as applicable:
a) Slide Rail - Replace by removing the five T-15 torx screws with sunroof in full "open" position. Note screw lengths and positions.
b) Cable Trolley - With slide rail removed and motor in "closed" position, use T-25 torx to release the 3 sunroof motor screws (note screw lengths and positions). Lower motor and suspend using coat hangar. Pull out trolley cable from copper guide tube and remove. With lift gate arm installed (see step 10[c] below), thread new trolly cable in and position so that cable end appears in notch of slide rail. See image below:

New cable trolleys come with matching toothed racks. They are sync'ed with trolley gear (see step10[e] below) and may be installed together. Once installed, re-install motor, ceiling liner (see step 10[e] below), and test.
c) Lift Gate Arms - Detach rain gutter and remove from cable trolley pin by drilling hole into old arm's slide track with hand drill (or, if re-using, use claw end of hammer to pry apart). Install new arms using slip joint pliers for leverage. For better access, install with trolley free from slide rail. Once installed in slide rail, verify gate arm slide tracks and wind deflector tab position.
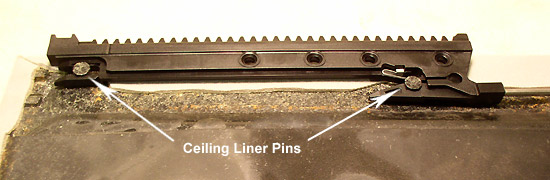
d) Ceiling Liner - Inspect ceiling liner for damage. Verify liner pins align correctly with slots from toothed racks. Re-align pins as necessary by tapping with small hammer. See image below:
With sunroof mechanism in full open position, test liner for freedom of movement BEFORE attaching toothed racks. Liner has flexible edges which can be shaped to conform with curvature of frame. Don't be alarmed if liner doesn't always catch the slide rail slot when closing by hand. The sunroof's trim panel (#3, diagram 1) pinches the liner between it and the slide rail, holding the liner down as it moves.
e) Toothed Racks - With sunroof mechanism in "closed" position, install racks as shown below.
Once installed, detach rain gutter from lift gates by pressing outward on metal arms and pull rain gutter forward, clear of roof. Install ceiling liner between rain gutter and cable trolley, then slide liner forward to engage racks. Re-attach rain gutter and test liner movement.
f) Gasket Seal - Apply a small bead of silicone to top ridge of panel lip. Begin installation from rear center, working around. The seal length is oversize. To achieve a tight seam, trim upper rubber portion of seal carefully 1/8" past joint with a box cutter. Then, simply bend lower metal reinforced portion back and forth (at cut line) until it breaks. De-burr with file. Then, force end into final position.
g) Panel - Verify condition of underside trim fabric before installation. If fabric material is separating, use Elmer's Glue spread with a small brush onto trim backing to re-attach fabric. Let dry overnight.
Install panel in gate arms and loosely install the 6 torx screws with roof in tilt position and liner detached. Level by trial and error. From inside the car, begin by pushing up slightly on the rear and tighten rear torx. Then press down from the outside on front of panel and tighten front torx. Then tighten center torx. Re-attach liner and close roof. Verify alignment. Repeat as necessary.
h) Motor - Remove sunroof switch panel and observe motor while operating sunroof. If motor shifts from torque of drive gear, tighten the T-25 torx mounting screws.
Whew! You're done. Pour yourself a beer and enjoy smooth sunroof operation!