Sunroof Water Leaks
- Model & Year: 95-01 7-Series, U.S.
- Expertise: Beginner
- Date: July 2016
- Updated: March 12, 2020
- Time Estimate: 4-6 hours
Tools Required
- Misc hand tools
- Bentley service manual (optional)
Facilities Needed
- None
Parts Required
- Sunroof seal: p/n 54-10-7-245-551 (updated 11/08), $30.68 list.
- Silicone sealant
Getting Started
When addressing sunroof water leaks, many people focus on the 4 sunroof cassette drain tubes. These tubes sometimes separate from the cassette causing leaks. In my case however, the drain tubes were in perfect condition, yet water still leaked.
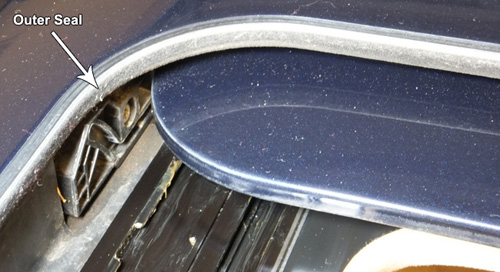
The leak source was the sunroof track end caps. It appears BMW is aware of this and has attempted to resolve it with silicone sealing around the end cap perimeter (see image below). But I've discovered the silicone treatment may not be sufficient.

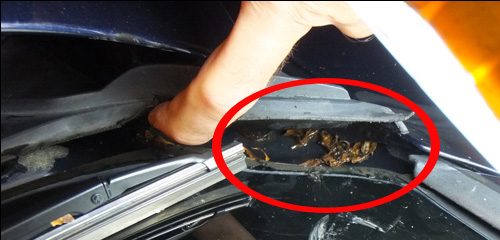
Additionally, the drain outlets at the base of the windshield may become restricted with debris:
But there's even more. The sunroof's outer seal is the first line of defense against water intrusion. But over time, the seal degrades, allowing too much water to pass. The seal part number has been superseded (updated) by BMW no less than 5 times, indicating this is a known problem. It's likely the sunroof seal on your car hasn't been updated since it left the factory.
Here's how it all happens:
During heavy downpours, a degraded sunroof seal allows excessive water to enter the sunroof cassette. While braking, the water rushes forward towards the partially clogged front drain tubes, but cannot exit fast enough. The water overwhelms the cassette channel and overflows onto the front end caps, which are insufficiently sealed. The water then runs onto the top of the headliner and leaks out the A-pillar juncture, down the side, and onto the floor.
The solution is to replace the outer seal, re-caulk the end caps, and clear the front drain outlets.
Procedure
NOTE: The following procedure is applicable to E38 steel sunroofs (glass moonroofs are similar).
End Cap Caulking
1) With sunroof open, remove end caps after removing the two torx retaining screws. This will make it easier to clean and prep the area for caulk, and/or to remove old caulk. See image below:

2) After cleaning, apply a bead of silicone caulk to both mating surfaces and reinstall end cap. Apply additional silicone to inside edge and between track gap and end cap. In other words, caulk all sides of end cap generously.
TIP: If torx screws don't align with receiver female threads upon re-installation, insert a very small screwdriver or similar tool into one receiver thread and pry as needed to re-align, while turning in other screw.
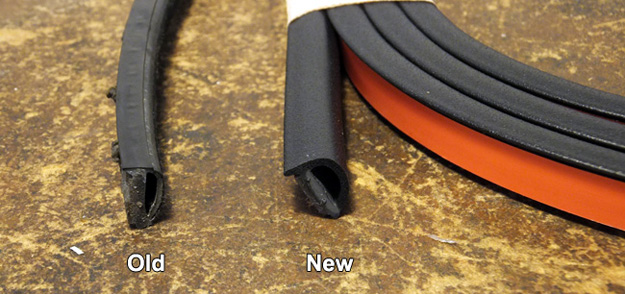
Replacing Outer Seal
Your old seal probably has a compressed profile after many years of use (see image below), along with degraded materials due to exposure and wear.
1) Remove old seal beginning at rear center seam.
Use a heat gun to weaken the adhesive as you pull it away. Alternatively, use a plastic spackling knife to help separate adhesive while pulling. It is important to remove as much adhesive with the seal as possible. Any adhesive that sticks to the roof opening will be very difficult to remove later and significantly increase the time required to complete seal replacement. See step 2 next.
2) Remove remaining adhesive from roof opening.
Depending on how much was removed from step 1, this step can take as much as 2-3 hours. It does not come off easily. Improvising with various tools (plastic, so as not to scratch the roof opening) may be required. I used finger pressure in a back-and-forth motion while wearing latex gloves, after soaking the adhesive with Acetone to loosen. Acetone will attack the paint, so use it carefully.
3) With roof opening clean and free of old adhesive, install (bond) new seal beginning at center rear.
With a measuring tool, locate center rear of sunroof opening and mark with tape on roof. Pull away a small portion of the orange protective tape on the adhesive and press a small section onto the marked spot of roof opening.
The new seal should be oriented with tab-end on top. The tab serves as a depth marker: it should be mostly flush with the roof line. After starting the new seal, use one hand to guide it in place (based on tab position) while pressing with the other. Be patient and don't rush this process. Corners require special attention.
Re-positioning after bonding can be done on small areas of newly pressed sections, but not recommended. It's probably best not to break the adhesive bond after it's set.
4) Using snips or similar cutting tool, snip seal to length and bond final section.
The new seal is over-size and must be cut to length. This requires a rather precise cut in order to minimize the gap. Take a careful measurement before cutting.
Clearing Front Drains
It is necessary to raise only a small portion of the lower windshield cowl to determine if your front drains are clogged. As a test, expel a mouthful of water into a straw inserted into one of the front sunroof drain holes. The water should exit immediately from the bottom corner of the windshield, run along the hood water channel, and drain over the headlight. Perform test with hood open, and have a helper observe how freely the water drains.
1) Open hood. Using needle-nose pliers and a small screwdriver, pry up and remove the 2-piece cowl retainers at bottom corner of windshield. See image below:

2) Lift up cowl corners and inspect for debris. Clear debris.
3) Re-install cowl retainers.
If you'd like, repeat water test to observe improvements. Done!
Now is a good time to check sunroof alignment. Per the service manuals, the front of the sunroof panel should be slightly below (lower) than the seal, while the rear of the panel should be slightly raised (above). See service manual(s) for alignment procedure.