Homelink Mirror/Module Retrofit
- Model & Year: 91-97 8-Series
- Expertise: Beginner
- Date: January 2010
- Updated: September 2010
- Time Estimate: varies
Tools Required
- Wire strippers, electrical tape, heat-shrink tubing (or tap-in squeeze connectors)
- Plastic cutting tools (ex: Dremel w/ cutting wheels, box cutter, coping saw)
- Basic hand tools
Facilities Needed
- Work bench
Parts Required
- Homelink Module: p/n 61318380869 or 82111470399; price: about $75 (used)
- Homelink Mirrors (for 8-series without keyless entry):
- p/n 51160304488 (image A) - red alarm "clown nose" and digital compass display in etched rectangular area of upper right corner; price: about $300 (used), or
- p/n 51169151852 (image B) - smaller, flat "clown nose" and digital compass display without etched rectangular area (hidden compass); price: about $350 (used), or
- p/n 51167028444 (image B) - smaller, flat "clown nose" without compass; price: about $200 (used).
- p/n 51167133655 - base cover set (see image below), $13.17 list.

Getting Started
Many BMW's from late '97 thru '08 offered the Homelink universal garage door opener as standard or optional. These took the form of either a headliner mounted transmitter module or integrated rearview mirror. Retrofitting one of these options in your 8-series is a great way to modernize your car and add some nifty functionality.
There is a bewildering array of part numbers for both the Homelink module and mirror, however common models of interest are cited above. Note that all Homelink parts have been discontinued by BMW. This means dealers may not have any remaining stock. Therefore the best source for these parts is eBay or salvage yards.
Mirror or module - which option to choose? That depends on your car's build date and budget.
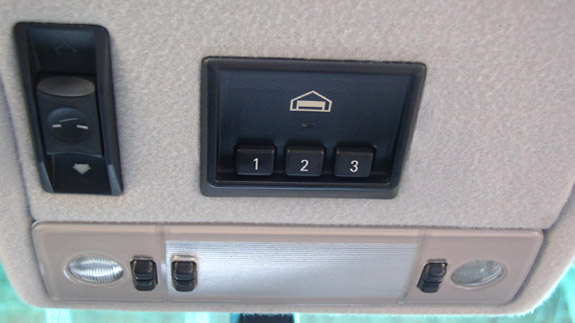
Homelink Module - will fit any model year by splicing into existing wiring in the headliner. Once installed, it neatly fills the empty panel space to the right of the sunroof switch. And, it is much cheaper than the mirror.
The bad news: 1) The module won't fit in the headliner without significant modification (regardless of part number). The 8-series wasn't designed to accommodate anything in the headliner panel, with the sunroof motor taking up almost all the space. 2) The headliner panel will obviously need to be cut to fit the transmitter module, adding significant time and effort to the retrofit. In addition, the module's mounting clips are too tall to attach onto the thin panel, requiring an improvised additional step to secure.
Apparently, some of the early Homelink modules (with the buttons that light up when pushed) do NOT operate rolling code devices. Later models with black numbered buttons do operate all modern rolling code devices. So, be advised.
Homelink Mirror - brings much more "wow" factor with available integrated digital compass. My research shows all 8's are pre-wired for power auto-dimming rearview mirrors and are thus adaptable, but with several limitations:
First, the alarm "clown nose" light will not function with the factory alarm of any 8-series, so this feature is lost. Even worse, all 8's with keyless entry (from late '93) are completely incompatible. These models use the mirror as a receiver of keyless entry signals. And since the factory alarm system is incompatible, keyless entry becomes inoperative. It is ironic that only late model 8's are not compatible with this modern part.
UPDATE: There have been attempts to relocate the stock alarm receiver and circuit board inside a Homelink mirror, but the auto-dimming feature and alarm clown nose are inoperative.
Additionally, models without keyless entry won't have a compatible electrical connector, adding time to the procedure. You'll need to purchase the connector new or salvaged from any BMW with keyless entry, or simply splice in.
The new mirror's mounting system (#2 above, not included with mirror) is keyed differently - surely intentional so as to indicate incompatibility - requiring a simple modification. And these mirrors are usually sold without the base covering caps (#4 above) so you'll need to purchase them separately. Lastly, the mirrors are much more expensive than the modules.
In summary, neither option is perfect. The modules require a lot of handiwork and the mirrors seem to be viable only in 8's without keyless entry.
A common Homelink complaint is the lack of owner's manual instructions. How do you code it? Simple. Use the instructions here: Homelink Website
Or, for a concise instruction sheet (1 page), I used this guide: Homelink Instructions
Procedure
Homelink Module
Installation and retrofit instructions were initially written by Bimmerforums member "Dr. T" in 2005:
Homelink Module Retrofit Instructions - by "Dr. T" from Bimmerforums, 3/15/05
I used his guide and have supplemented it with my experiences here:
1) For the best-looking results, locate the module in the plastic panel as shown below. This centers the module in front of the main dome light and positions the module's front lip inline with the sunroof switch.
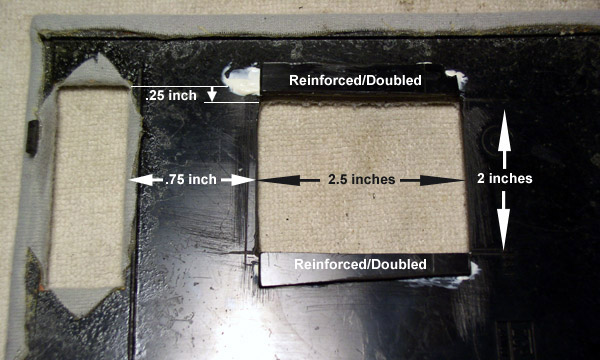
Use a straight edge and a scratch awl to mark your cut line. Then use a sharp box cutter to deeply score the plastic. I finished the cut using a coping saw - cutting completely thru both the plastic and fabric. (The panel is too thick to cut completely thru with a box cutter.)
To achieve the necessary rise on the back of the panel to secure the module, I used the scrap piece from the cut-out to glue a 1/4" strip to both the front and rear edge of the opening, producing a doubled attachment point. See image above. Since most glues aren't worth a damn - even construction adhesives - allow it plenty of time to dry (at least overnight) before installing.
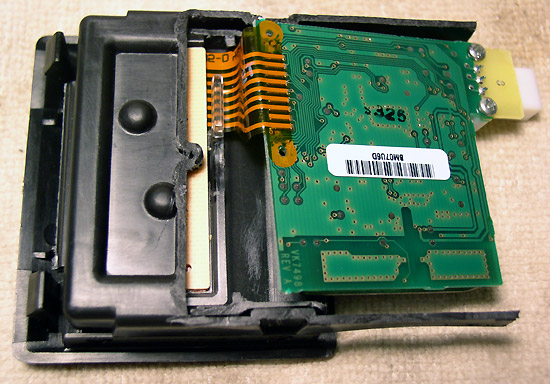
2) Significant modification of the plastic casing is required to make it fit. It separates into four different pieces which simplifies this task. A Dremel tool with cutting wheel works well for this. Only the plastic part with the buttons and the circuit board were left unaltered. The resulting parts are seen below:
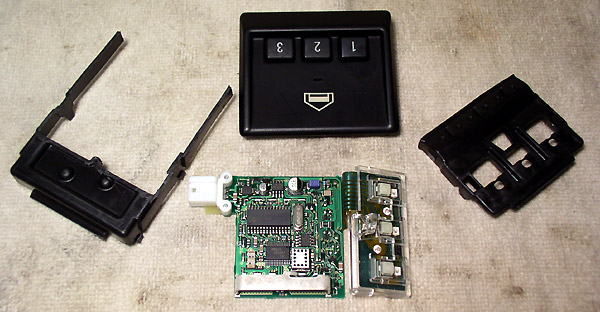
Be very careful with the delicate circuit board. DO NOT fold the main board over the front button board as this will weaken and break the delicate traces connecting the two (ask me how I know). The "finished" module is shown below. Note the rear (main) portion of the circuit board is hanging free:
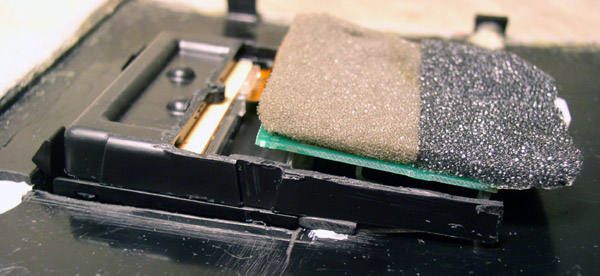
Once the circuit board is covered with the foam pad and installed in the headliner, the loose circuit board is pressed down firmly against the sunroof motor, so don't worry about it flopping around. The image below shows the ready-to-install module (note the doubled attachment points):
3) Tap-in squeeze connectors (available at Radio Shack, etc.) may not fully splice into the small gauge wires used on both the Homelink wiring and headliner sources. I had to splice in by simply stripping, wrapping, and taping. I obtained the matching factory wiring harness from a salvage yard. Remove the dome light strip for full access. Connections are as follows:
| Homelink Wire Color | Headliner Source | Wire Type |
|---|---|---|
| green/white | violet/white (vanity light) | power |
| grey/red | grey/black (sunroof switch) | lighting |
| brown | brown (vanity light) | ground |
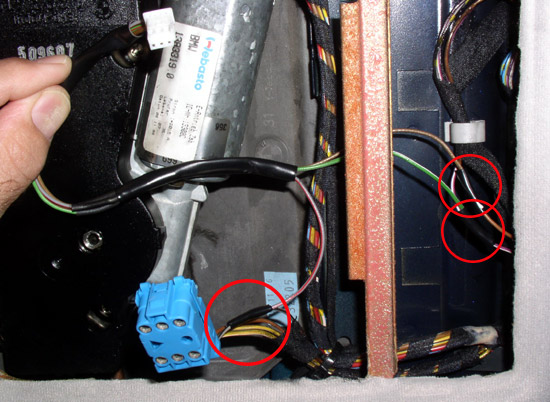
Leave about 8" of wire length on the connector in order to reach around to the back of the module. I didn't notice how much length is needed an had to go back to add additional wire. See image below (note circled splice points):
4) Check your installation's fit & finish carefully. There should be no deformation of the headliner panel once installed with the module in place. If so, you haven't removed enough material from the Homelink's plastic casing.
TIP: The Homelink's wiring connector is very difficult to unplug. To release, grip the white female connector with needle-nose pliers while prying between the pliers and the circuit board's male connector with a small screwdriver.
Code via the link(s) above and enjoy!
I found the transmitting range of my module to be greater than my old visor-mounted remote by several yards. I love that - it allows me to roll straight into the garage without having to stop and wait for the slow door. I have a single garage door, and in order to prevent wearing the paint off only one button, I coded all three buttons. This allows me to select any button without even having to look up.
Homelink Mirror
8-series without keyless entry
1) (With auto-dimming mirror) Using small screwdriver or suitable tool, release wiring cover on front of mirror arm.
2a) (With auto-dimming mirror) Grab mirror arm at base and twist counter-clockwise 1/4 turn. Disconnect wiring.
2b) (Without auto-dimming mirror) Grab lower base of mirror and pull back and up to remove.
3) Modify new mirror mounting arm to fit base by filing down the three mounting points shown in red below, right:
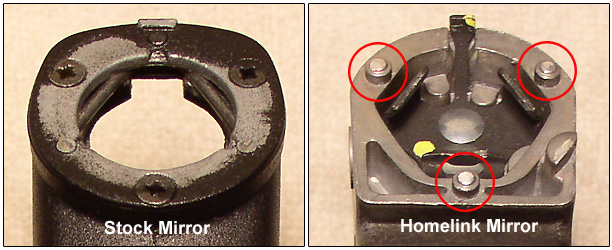
Note that new mirrors do not twist on/off base like most stock mirrors. Compare the circular opening of stock mirror's base (left) with triangular opening in Homelink mirror (right).
4) Locate mirror connector (in headliner). Snip/bypass/rewire with new connector, noting terminals as shown below:
| Original Terminal # | New Terminal # | Wire Type |
|---|---|---|
| 1 (brown) | 10 | ground |
| 2 (blue) | 1 | reverse signal |
| 3 (yellow/red) | 3 | power |
| all others not used |
5) Once connected, install new mirror by locating top center on base, then leverage arm into place. Do not twist.
Code Homelink mirror using link(s) above and enjoy!
8-series with keyless entry
Not compatible - renders keyless entry system inoperative.