Alarm Siren Replacement
- Model & Year: 96-97 8-Series
- Expertise: Beginner
- Date: December 2011
- Updated:
- Time Estimate: 2 hours
Tools Required
- Metric sockets/wrenches (10, 9, 7mm)
- Basic hand tools
Facilities Needed
- None
Parts Required
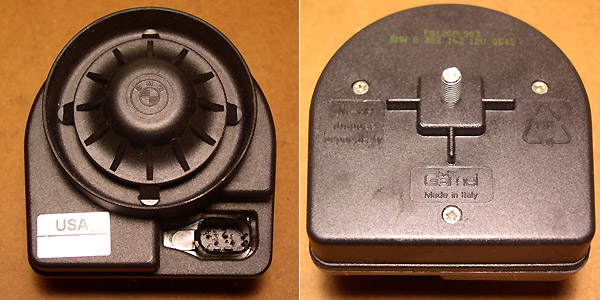
- Alarm Siren ("Alternate Power Siren"), p/n 65 75 8 383 153, price: $147 (list)
Getting Started
Has your 1996-1997 8-series' alarm siren stopped its usual chirp notifications when you arm or disarm it? Has your siren ceased functioning all together? You probably have corroded nicad batteries inside your siren module. The nicads serve as a back-up power source in case a thief tries to disconnect the battery before stealing your car. Note that parts of this DIY may be applicable to pre-'96 models.
The alarm siren is a sealed unit, with no user serviceable parts inside (ask me how I know). The only repair is replacement. Like most car modules, it includes a complex circuit board, and as such is an integral part of the factory alarm system (EWS). It is also a part shared with newer BMW's such as the E38, E39, and E46.
For security reasons, the compact siren module is hidden inside the fresh air cowl on the right (passenger) side, behind the engine. Cowl removal is required for access, followed by a lot of blind fumbling as the module is buried mostly out of view. It is secured by a single 10mm nut.
TIP: Is your alarm key worn out?

Give it new life with a replacement rubber key pad! They're available from various eBay vendors for about $10 with shipping (search keywords: "BMW key pads"). It's also a good time to replace your key battery.
See this previously written DIY procedure from E38 Bimmerforum member "Qsilver7": BMW Alarm Key Renewal
Procedure
1) Working under the hood, lift off the rubber gasket surrounding the cowl edge and fold it against the windshield to keep it out of the way (I used a heavy towel to hold it down. You could also place the left wiper arm over it). Then remove upper plastic trim cover by first removing the three 10mm securing screws and optional 9mm cap screw at base of right wiper arm. See image below:
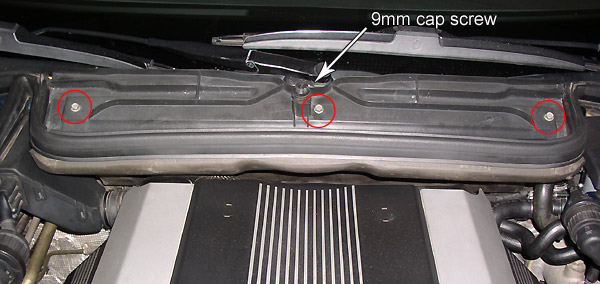
With trim cover removed, the cabin air filters will be visible. You may leave them in place.
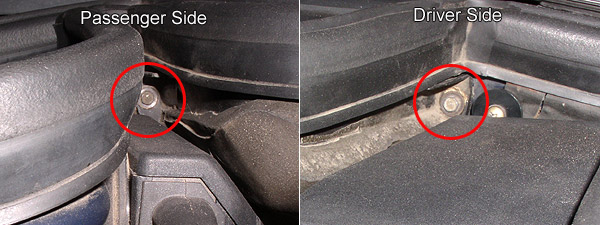
2) Using a 7mm socket, remove the single securing screw on each side of the cowl (2 total). Be careful not to drop the small screws into the engine bay (you may want to magnetize your socket). See image below:
3) Lift cowl up and off. Set aside. Hiding inside the lower right (passenger) side you will see the alarm siren:
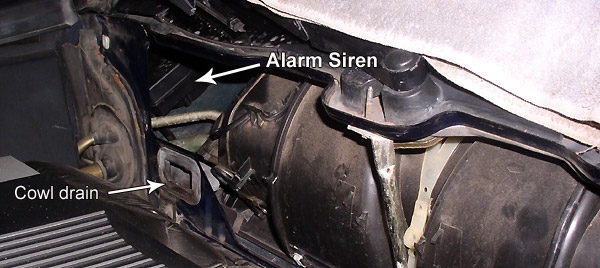
It is facing down, and secured on a bracket with a single 10mm nut from above.
Now is also a good time to clean the cowl drains (mine were clogged with leaves) and inspect, clean, or replace your cabin air filters.
4) Place a protective cover over the right (passenger) fender to prevent scratching. Lean over fender and reach blindly up and inside cowl to feel for the siren's 10mm nut. Remove nut using a small wrench (be careful not to drop nut inside!). Work siren down and off securing bracket. It is pinned between the bracket and floor of cowl and must be squeezed out by force. Once released, pull siren toward center of cowl. When fully in view, turn it over to unplug connector. Remove siren.
5) Installation is reverse of removal.
Your alarm system has new life! With a new battery in my key, I can arm (one chirp)/disarm (two chirps) from about 20 yards. Test also your panic button for full siren functionality.