Driveshaft CV Joint Replacement
- Model & Year: 97-03 5-Series
- Expertise: Intermediate
- Date: August 2014
- Updated:
- Time Estimate: 8-10 hours
Tools Required
- Metric tool set (14mm open wrench, assorted sockets)
- Heavy hammer plus other basic tools
- Jack stands
- Hydraulic jack (optional)
- Bentley or Haynes manual (optional)
Facilities Needed
- Garage (or solid surface)
Parts Required
- Driveshaft CV Joint Gasket (part #17, diagram A below), p/n 26 11 1 229 502, price: $2.57
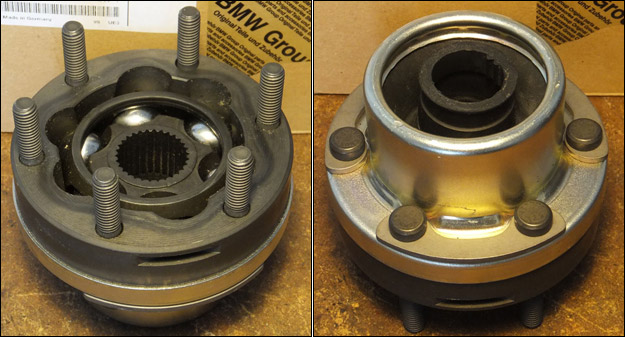
- Driveshaft CV Joint (above and part #16, diagram A below; part number varies). Price: $160-$200.
- CV Joint Grease, 3-4 oz., retail price: about $4
Getting Started
Does the underside of your 5-series, where the end of the driveshaft meets the differential, look like this?:
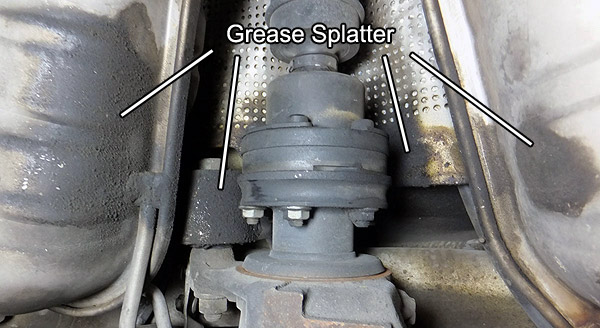
If so, you probably have a failed CV joint gasket which is allowing grease to leak, forced out by the centrifugal force of the spinning driveshaft. Depending on how long it's been leaking, the CV joint (Constant Velocity) may no longer be getting proper lubrication. The leak seems to come from the nuts holding the CV joint to the differential's input flange.
Based on your preferences, you may either: 1) replace gasket only, then repack joint with grease, or 2) install new CV joint and gasket. Either option requires almost the same amount of work.
Parts relevant to this procedure are shown in this BMW diagram:
NOTE: Gasket (part #17) is erroneously shown to install forward of the CV joint; it actually installs behind it. New CV joints come with new bolts (part #13) and washers (part #14) but not nuts (part #19), so these will have to be re-used. New CV joint part numbers vary by model and year but look practically identical (see RealOEM for part numbers). Their replacement procedures are the same.
Procedure
If you're doing this job for the first time, allow for about 8 hours of strenuous work. This job requires a lot of crawling and lying around on a hard floor, so use work blankets as cushions. Prepare further by familiarizing yourself with the driveshaft CV joint procedures in either the Bentley or Haynes manual.
1) Highly elevate the rear of your car safely on jack stands. (Never rely on jack alone!)
TIP: Leave the rear tires on. They won't interfere with your work space and will be useful in Step 4.
2) Remove center-rear section of exhaust system (center silencer or "scuba tanks"). It's not necessary to remove the muffler(s), although you may do so. Refer to Bentley or Haynes manual if needed. Use caution: exhaust components are heavy.
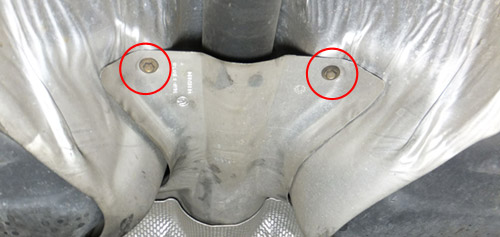
3) To make room for dropping the end of the driveshaft, pull out and remove the center upper heat shield by loosening its two 10mm screws, circled in red below (530i shown):
4) Using a 14mm wrench, loosen and remove all six of the nuts holding the CV joint to the differential input flange.
To gain access to all six nuts, shift the transmission into neutral and rotate the driveshaft by hand-turning the rear tires. Shifting the transmission back into "P' will lock the driveshaft again and allow for torquing the nuts. An assistant will make this task easier and quicker.
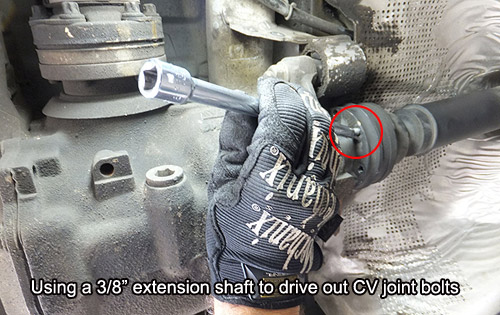
5) Drive out the six CV joint retaining bolts.
Since these bolts are press fit into their respective holes, considerable force must be applied. And since the body of the differential gearbox prohibits applying a hammer directly onto the rear of the bolts, use an extension (such as a 3/8" drive extension) from the right (passenger) side of the differential. A few strong blows with a heavy hammer to the end of your extension should release the bolts. See image below:
In order to reach all six bolts, apply the same driveshaft rotation technique described in Step 4 above. After driving out the last bolt, the driveshaft should fall free of the differential input flange. See image A below.
6) Drop end of driveshaft and rest on a jack stand. See image B below.
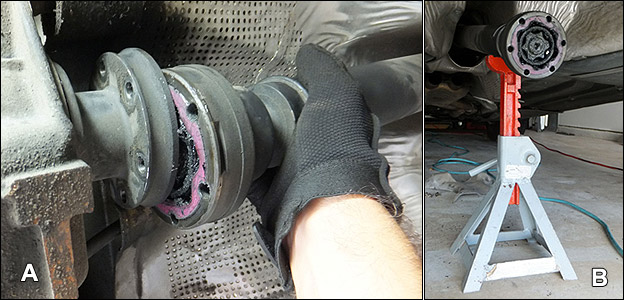
Note the purple-colored gasket attached to the CV joint in images above. This is the gasket in need of replacement.
Depending on your preferences, use the appropriate procedure below:
Gasket Replacement Only
1) Use a scraper to remove old gasket. Clean old grease off surfaces of both CV joint and differential input flange.
2) Pack joint with 1-2 ounces of grease. Also apply some grease to input flange center cup.
3) Follow steps 6-7 below.
CV Joint Replacement
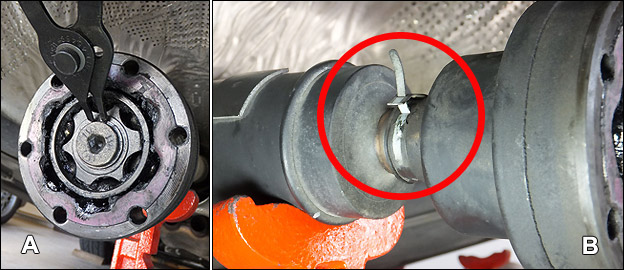
1) Remove snap ring from driveshaft (image A below) and the joint's boot clip (image B below).
2) Pull old CV joint off driveshaft end. It will come off by hand in most cases. If not, tap with hammer.
Clean old grease off differential input flange center cup. Now is a good time to also clean grease off other underside parts, such as your exhaust silencer tanks.
3) Prepare new CV joint by driving out new bolts with heavy hammer.
4) Install new CV joint on driveshaft end; tap center "star" gear with hammer to force joint fully onto driveshaft end. Secure with snap ring and boot clip.
5) Pack with 3-4 ounces of grease. Also apply grease to differential input flange center cup.
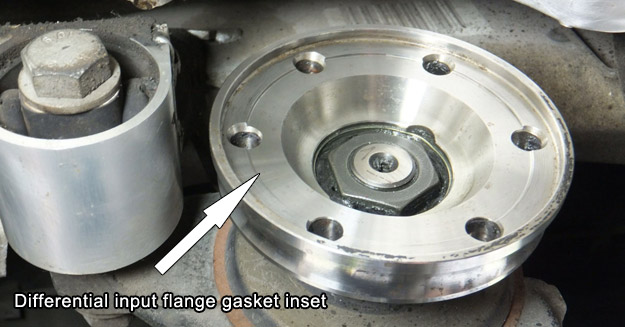
6) Insert all six bolts (with washers) until they protrude about 1/4" on other side; place new gasket on CV joint surface, inside bolts.
NOTE: The gasket will ultimately reside within an inset area cut into the surface of the differential's input flange as shown in the image below. When installing, placing the gasket on new CV joint instead of on flange inset allows you to better monitor gasket as new CV joint is moved into final position.
TIP - Applying a thin layer of grease to the back of the gasket will help it stick to the CV joint during installation.
7) Install new CV joint in reverse order.
NOTE: Before torquing CV joint nuts, the bolts have to be fully pressed into their seats. Just as in driving out the old bolts, use a heavy hammer, this time directly onto the bolt heads. Several blows will be required. Simply trying to seat the bolts by torquing the nuts will not suffice!
Follow-up your work by examining the new CV joint area for grease leaks after a few weeks of driving.