Valve Cover/Gasket Replacement
- Model & Year: 92-98 3-Series
- Expertise: Beginner
- Date: July 30, 2003
- Updated:
- Time Estimate: 4-5 hours
Tools Required
- 8 and 10 mm sockets with rachet and extension bar
- Universal joint (for rachet)
- Torque wrench
- Other basic hand tools
Facilities Needed
- Garage or level surface
Parts Required
For '93-on, six cylinder:
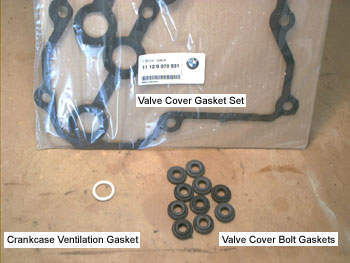
- Valve cover gasket set, p/n 11 12 9 070 531, $24.00 retail
- (15) Valve cover bolt gaskets, p/n 11 12 1 437 395, $1.19 retail each
- Crankcase ventilation hose gasket, p/n 11 15 1 730 724, $2.84 retail
- New valve cover, p/n 11 12 1 738 410, $185 retail (optional)
Getting Started
The valve cover gasket and crankcase ventilation hose on 3-series cars are prone to leak over time, creating a messy engine compartment with matching oil stains on the ground. Fortunately, replacement is fairly easy. This procedure and corresponding part numbers applies to '93-on six cylinder cars, but other 3-series are similar.
Additionally, most valve covers themselves seem to have been poorly finished from the factory with a powder coat beneath gold metallic paint. The paint chips and peels away, leaving a really ugly scene. Gasket replacement provides a good opportunity to re-paint or replace this cover.
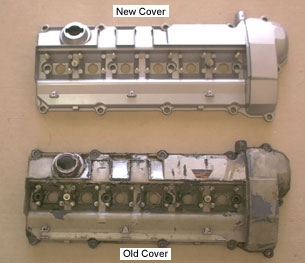
NOTE: Stripping and re-painting the existing cover will be very time consuming and messy, preferably requiring bead blasting. New covers are inexpensive after car club discounts (about $140) and may be worth your money in time savings. New covers come with a silver finish, which may be painted black with high-temperature spray paint.
Procedure
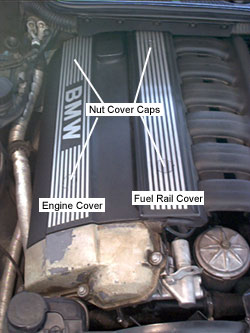
1) Remove oil filler cap. Using small screwdriver, pry out plastic nut cover caps and remove engine cover and fuel rail cover nuts with 10mm socket. Pull off plastic covers and set aside. See image below.
2) Pull out crankcase ventilation hose. See image below.
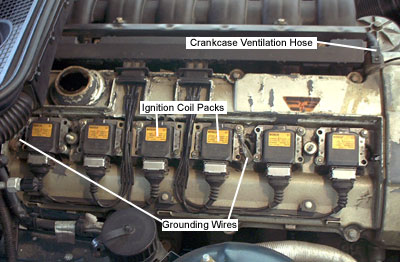
3) Using 10mm socket, remove ignition coil pack bolts and pull out coil packs from each spark plug tube. Rest coil packs on top of intake manifold. Also remove grounding wires and set aside. Try to keep debris out of the plug tubes. See image above.
4) Using 10mm socket, remove valve cover bolts. Work in an alternating criss-cross fashion starting from the corners. Use a universal joint on your socket to reach the two bolts at the rear. Don't forget the four bolts down the center of the valve cover.
5) Using a small hammer, gently tap the valve cover loose from the old gasket and remove.
6) Pull off old gasket along with spark plug tube gaskets. Clean gasket surfaces, being careful not to drop any debris in engine. Marvel at the camshafts.
7) Remove the three bolts from plastic plug wire holder on old valve cover with 8mm socket and install wire holder on new valve cover.
8) Install new gaskets from gasket kit.
9) Rest new valve cover in place. Check gasket alignments.
10) Slip new valve cover bolt gasket on each valve cover bolt and thread them in place, finger-tight.
11) Using torque wrench, tighten each bolt to about 10 nm (89 in-lbs) in criss-cross fashion, this time starting from the center.
12) Replace crankcase ventilation hose gasket and re-connect hose.
13) Replace ignition coil packs and grounding wires. Plug wires are numbered 1-6, starting from front of engine, corresponding to cylinder numbers. No torque spec here.
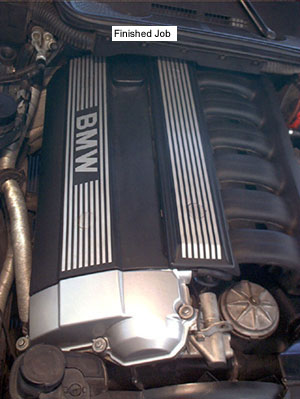
14) Replace plastic engine covers and you're done!