M-Tech Front Spoiler Upgrade
- Model & Year: 92-98 3-Series
- Expertise: Intermediate
- Date: February 18, 2002
- Updated:
- Time Estimate: 8-10 hours
Tools Required
- Jack stands
- Metric wrench set
- Other basic hand tools
- Bentley or Haynes manual
Facilities Needed
- Garage or level surface
Parts Required
- "M-Tech" front spoiler kit (about $550)
Getting Started
 |
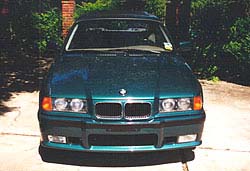 |
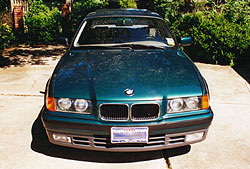
| Before | After |
For those that prefer the aggressive, paint-matched look of the M3 spoiler, this upgrade is available from several sources including dealers. I purchased mine from Bavarian Autosport.
This modification isn't cost effective as it will not increase the resale value of your car, but it will dramatially improve the front-end on the '92-'93 cars and offers a paint-matched solution for all others. I subsequently paint-matched my side skirts with some improvised methods, leaving only the rear apron to match.
Cost: $550 spoiler, $200 professional paint.
Do yourself a favor: don't paint it yourself. Use professional painting. Not only will it look much better, it will be a true color match. Store-bought spray paints are simply too thin to provide a good finish and will end up looking cheap when compared to the rest of the car.
Be advised the installation instructions that come with this kit are useless (all fasteners are unaccounted for). Refer instead to the Bentley manual (page 510-3) for removing the old spoiler. The kit comes complete with spoiler, brake ducts, trim pieces, and fog light holders. Also, you'll need a new license plate holder because the old one won't fit.
Procedure
The procedure for removing the front spoiler/bumper is straightforward and well documented in both the Bentley and Haynes manual, so I won't repeat it here - just supplement it:
Use jack stands to safely elevate the front of your car. Be careful with the under-spoiler trim parts, since many may be damaged or worn out. Don't forget to release the retaining screws inside both front wheel wells before removing the bumper.
Remove the air temperature sensor from the brake air duct. After releasing the two main bumper bolts, pull the whole assembly off its side holding brackets.
With the front spoiler/bumper off, I used the opportunity to clean most front-end parts. Drive out the plastic rivets holding the old spoiler to the bumper. Practice driving a few old rivets in your new M-Tech spoiler, then use the new ones. I used a heavy hammer and a punch.
Re-use your existing fog lights and install them in the new mounting brackets. I aimed these lights by noting their position in my old spoiler - essentially flush with the surface. Mine needed to be adjusted all the way down. They can always be adjusted later with the set screw.
Installation of the new spoiler is then reverse of removal of the old one. Don't forget the underside parts.
Installed look: Way cool!